Introduction
A fellow buddy asked my some help for stating to create IA rather than replying to him by PM, we might as well make one more guide lol.
When you read this guide, don't hesitate to ask me additional questions by mail and I'll complete it.
Your PC
First of all, you're going to need good hardware. Doing everything locally requires a very good PC. the minimum requirement is a graphics card with 8g (can work with 4 but with limitation) of VRAM and an nvidia graphics card. It's possible with an AMD, but it's complicated to set up.
Make sure you have a well-ventilated tower. Every generation, push your graphics card all the way, and also when you're generating, don't use other software that requires a lot of power, such as 3D you can just crash your PC.
The interface
The current reference software is created by AUTOMATIC111, which you can find on github :
Stable Diffusion Webui by AUTOMATIC 1111
For an easy install, you can now DL a complete ready ot of the box software you just have to DL the last zip on the release page :
Optimize your install
When you install the interface, it’s not optimal. You can edit the file web-ui.bat (for windows, sh for linux & mac) and add some parameters :
Line 6 :
set COMMANDLINE_ARGS= --xformers
Activate xFormers for faster image rendering. It's disabled by default because some machines don't support it.
set COMMANDLINE_ARGS= --update-all-extensions
When you start your UI, this will automatically check if your extension needs to be updated and will download them.
set COMMANDLINE_ARGS= --lowvram
Heavy reduction vram consumption. Perfect for graphics cards with only 4GB VRAM. Heavy reducing the rendering speed, very devastating.
set COMMANDLINE_ARGS= --medvram
Light reduction vram consumption. Perfect for graphics cards with only 8GB VRAM. Little reducing the rendering speed.
set COMMANDLINE_ARGS= --no-half-vae --no-half
Sometimes, especially when you upscale, your model or VAE can return a black image. to avoid this, activate these two parameters. Consumes more vram.
You can try --no-half-vae alone first sometime It's enough.
set COMMANDLINE_ARGS= --xformers --medvram --no-half-vae --no-half --update-all-extensions
Of course, you can activate them all together. In fact, I do.
The differents files
Models in: stable-diffusion-webui\models\Stable-diffusion
Embeddings/Textual Inversion in: stable-diffusion-webui\embeddings
Hypernetworks: stable-diffusion-webui\models\hypernetworks
Lora and LoCON in: stable-diffusion-webui\models\Lora
LyCORIS in: stable-diffusion-webui\models\LyCORIS
ATTENTION !!!
For the LyCORIS files you will need an extension in AUTOMATIC111 UI :
https://github.com/KohakuBlueleaf/a1111-sd-webui-lycoris
You can install this from the UI in extension → available → search.
«wtf is lora ? lycoris ? cktp ? help !»
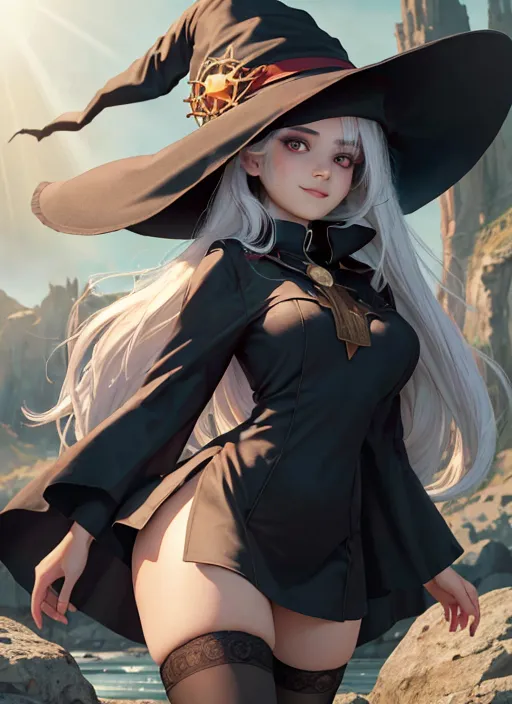
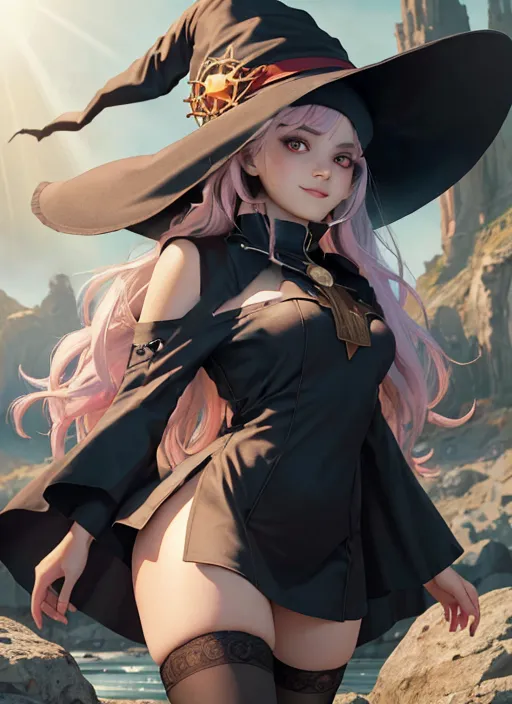
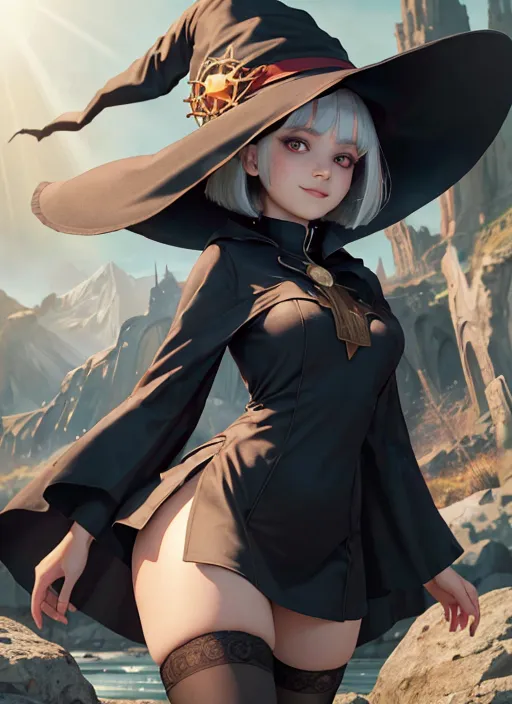
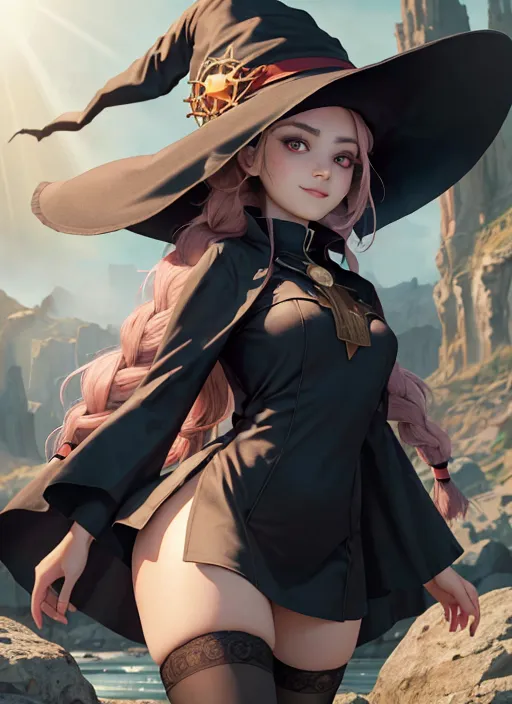
The models
To make images, only one thing is mandatory, a model file, they exist in two types. ckpt or safetensors. The second was created because the ckpt file can be full of viruses. So I strongly advise against their use.
Sometimes model files need to be color-corrected, to achieve this we use a VAE file. To use them with this interface it's simple: they just need to have the same name as the model file, with
.vae
at the end and put next to it. Like this :
- stable-diffusion-webui-ux\models\Stable-diffusion\abyssorangemix3AOM3_aom3.safetensors
- stable-diffusion-webui-ux\models\Stable-diffusion\abyssorangemix3AOM3_aom3.vae
.safetensors
If you download the model on civitai it's marked if it needs a VAE and offers it for download.
The model is the central element of your generation, making 98% of the rendering. It's also the one that's sensitive to your prompt.
It's up to you to choose what you like. On Civitai or Pixai there's plenty to pick.
«Yes, but there's too much choice, I'm lost!»
Ok, so, start with this one : https://civitai.com/models/10028
It’s a versatile model, you can create semi-realistic, manga or comic. Thanks to a friend for showing me this model.
Models Categories
Some models are more specialized and can be divided into four types:
NoRealistic (2D), MidRealist (2.5D), PseudoPhotorealistic (3D)Keep in mind that almost any model can move from one category to another (more or less efficiently) with the right keywords like :
(realistic:1.2),(photorealistic:1.2)
If you put them in the prompt then you're approaching a 3D model, otherwise if you put them in the negative prompt then you're approaching a 2D model.
Adult content
There are also two possible model sub-categories: safe and NSFW (Not safe for Work). The former tend to produce images for the general public, avoiding pornographic or extremely violent images. The second are just the opposite. In fact, most models are capable of both. As with realism, it's possible to push a model in one direction or another:
nsfw, hentai
If you put them in the prompt then you'll more often get porn images, in the negative it will try to avoid this kind of content.
Never forget that it's not an exact science. Even with the right keywords, a model can produce nsfw content by accident, but you still reduce the risk by 95%.
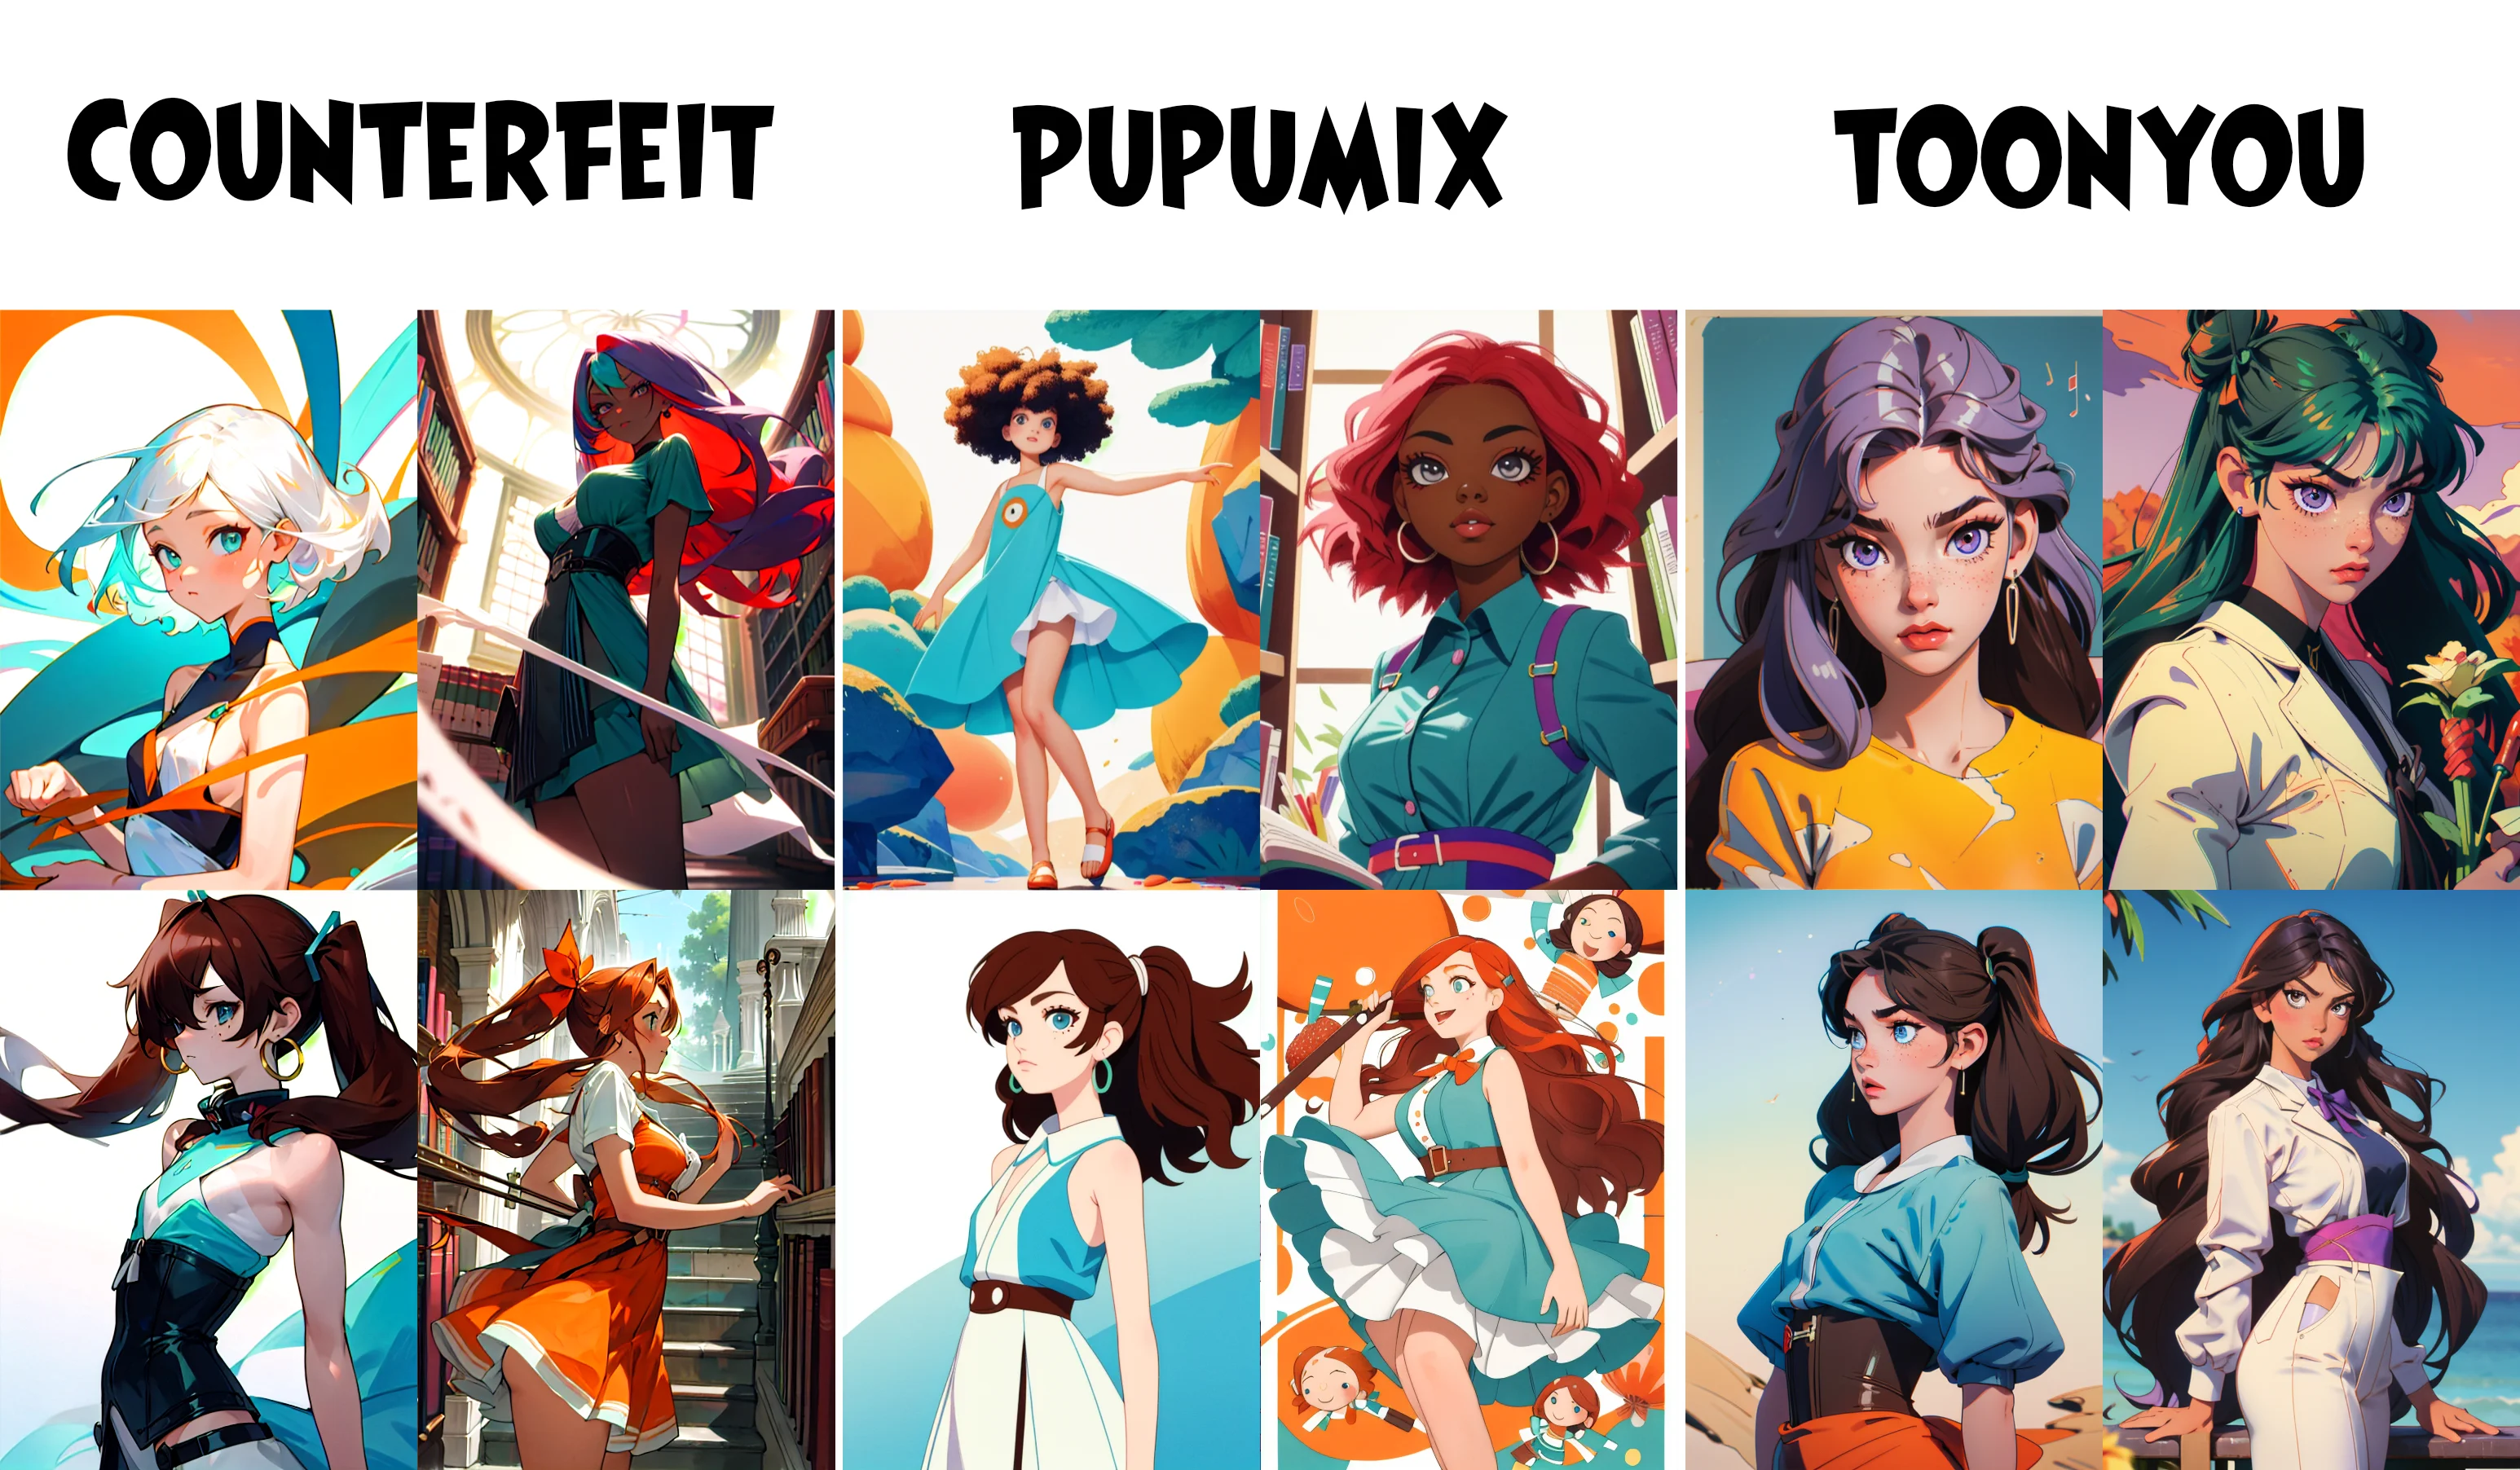
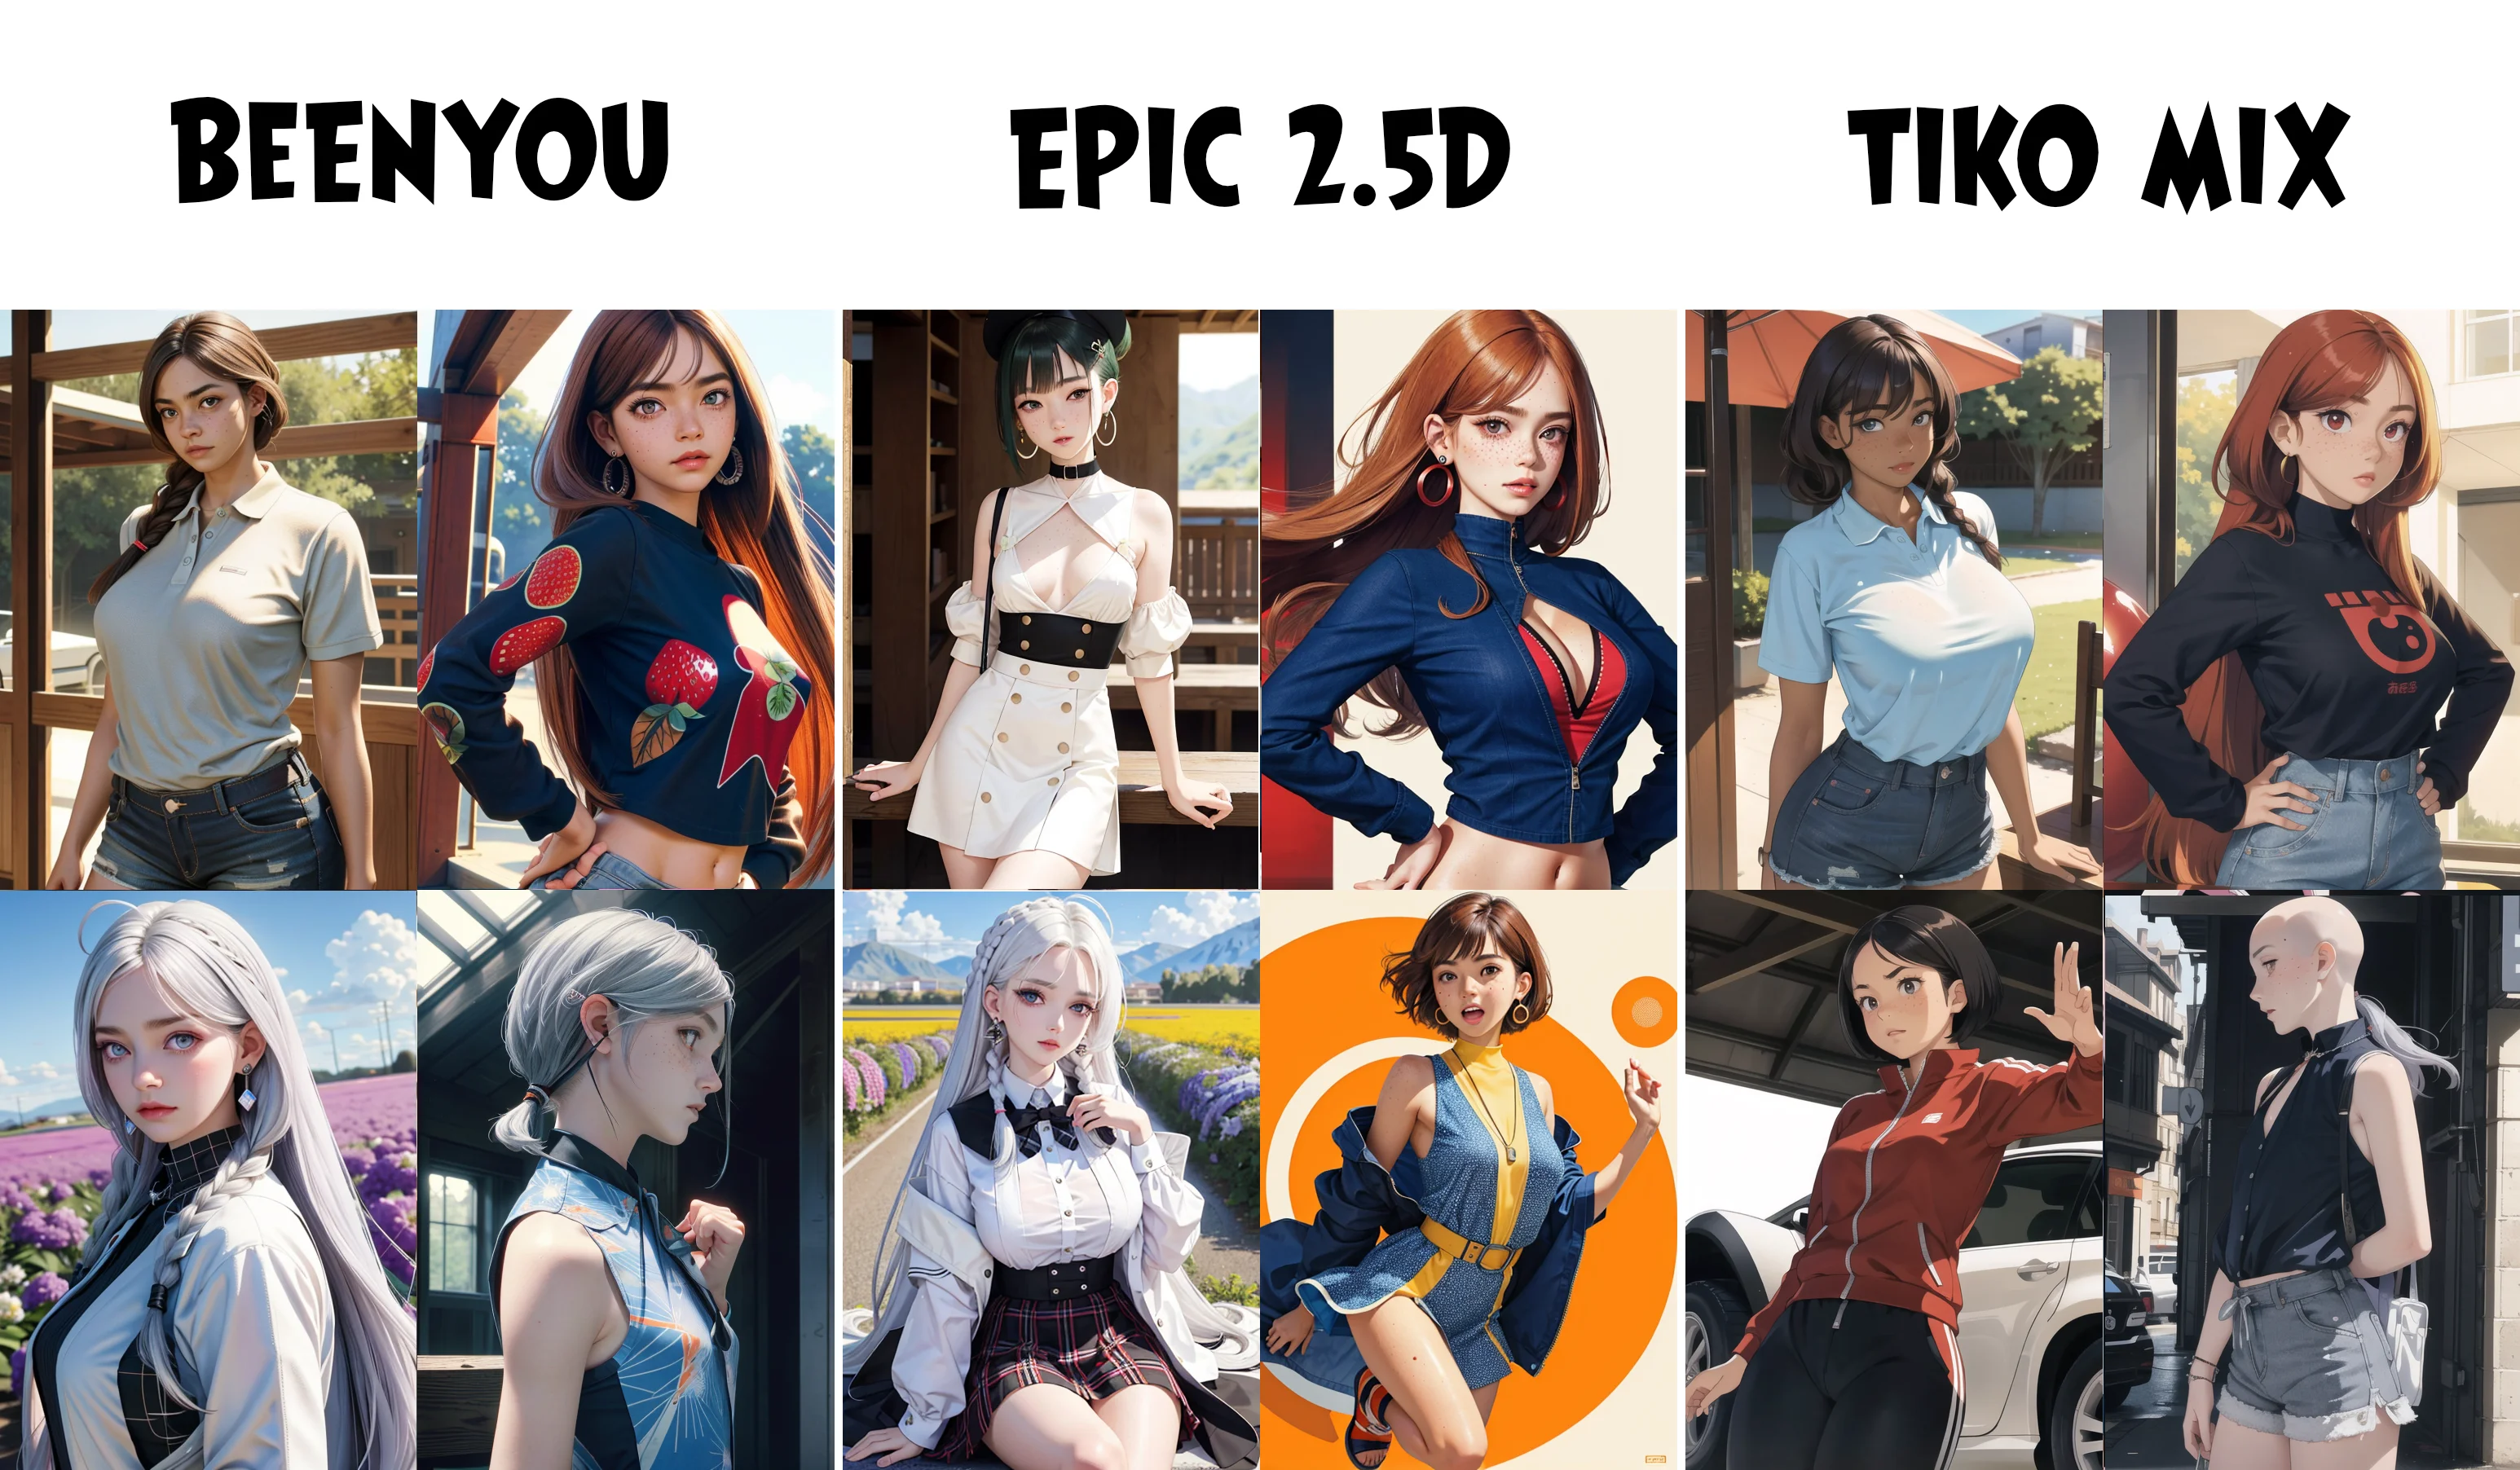
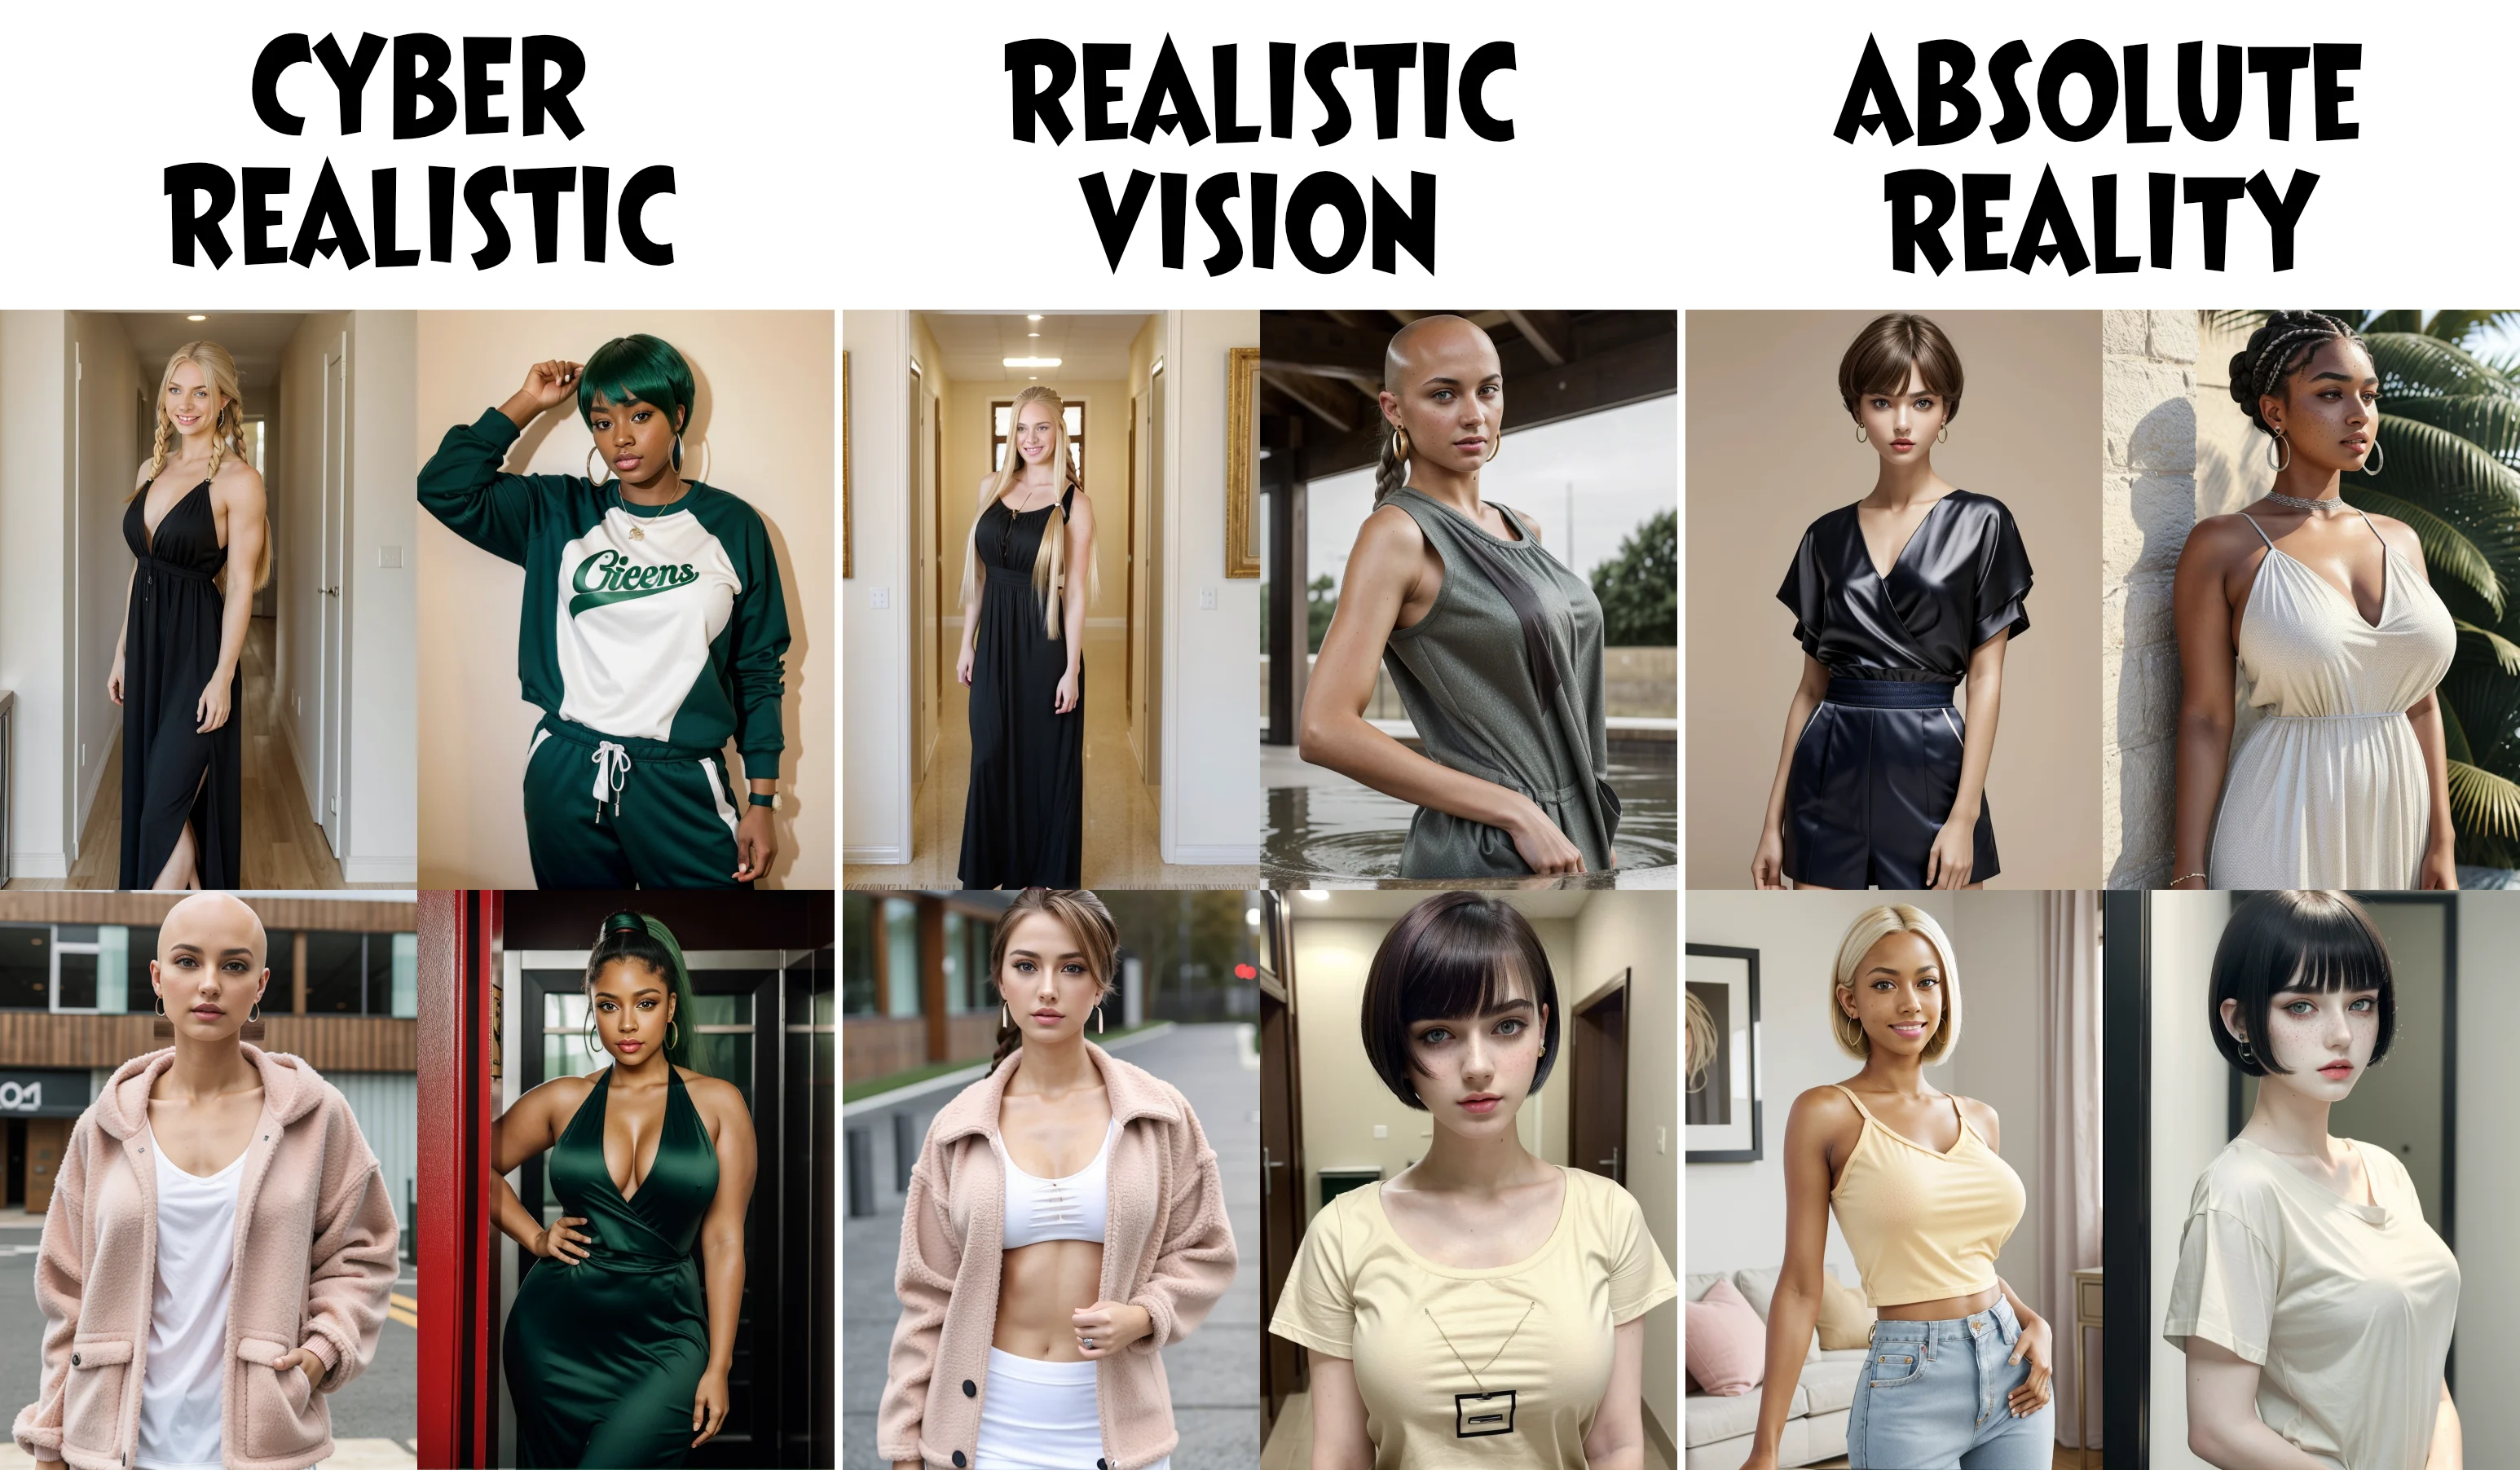
And before you ask, here, some models I found interesting :
NoRealistic (2D)
MidRealist (2.5D)
PseudoRealistic (3D)
Never forget this :
(Photo)REALISTIC MODELS CAN PROVOKE BAN OR LEGAL PROBLEM ON IF YOU GO TOO FAR !!
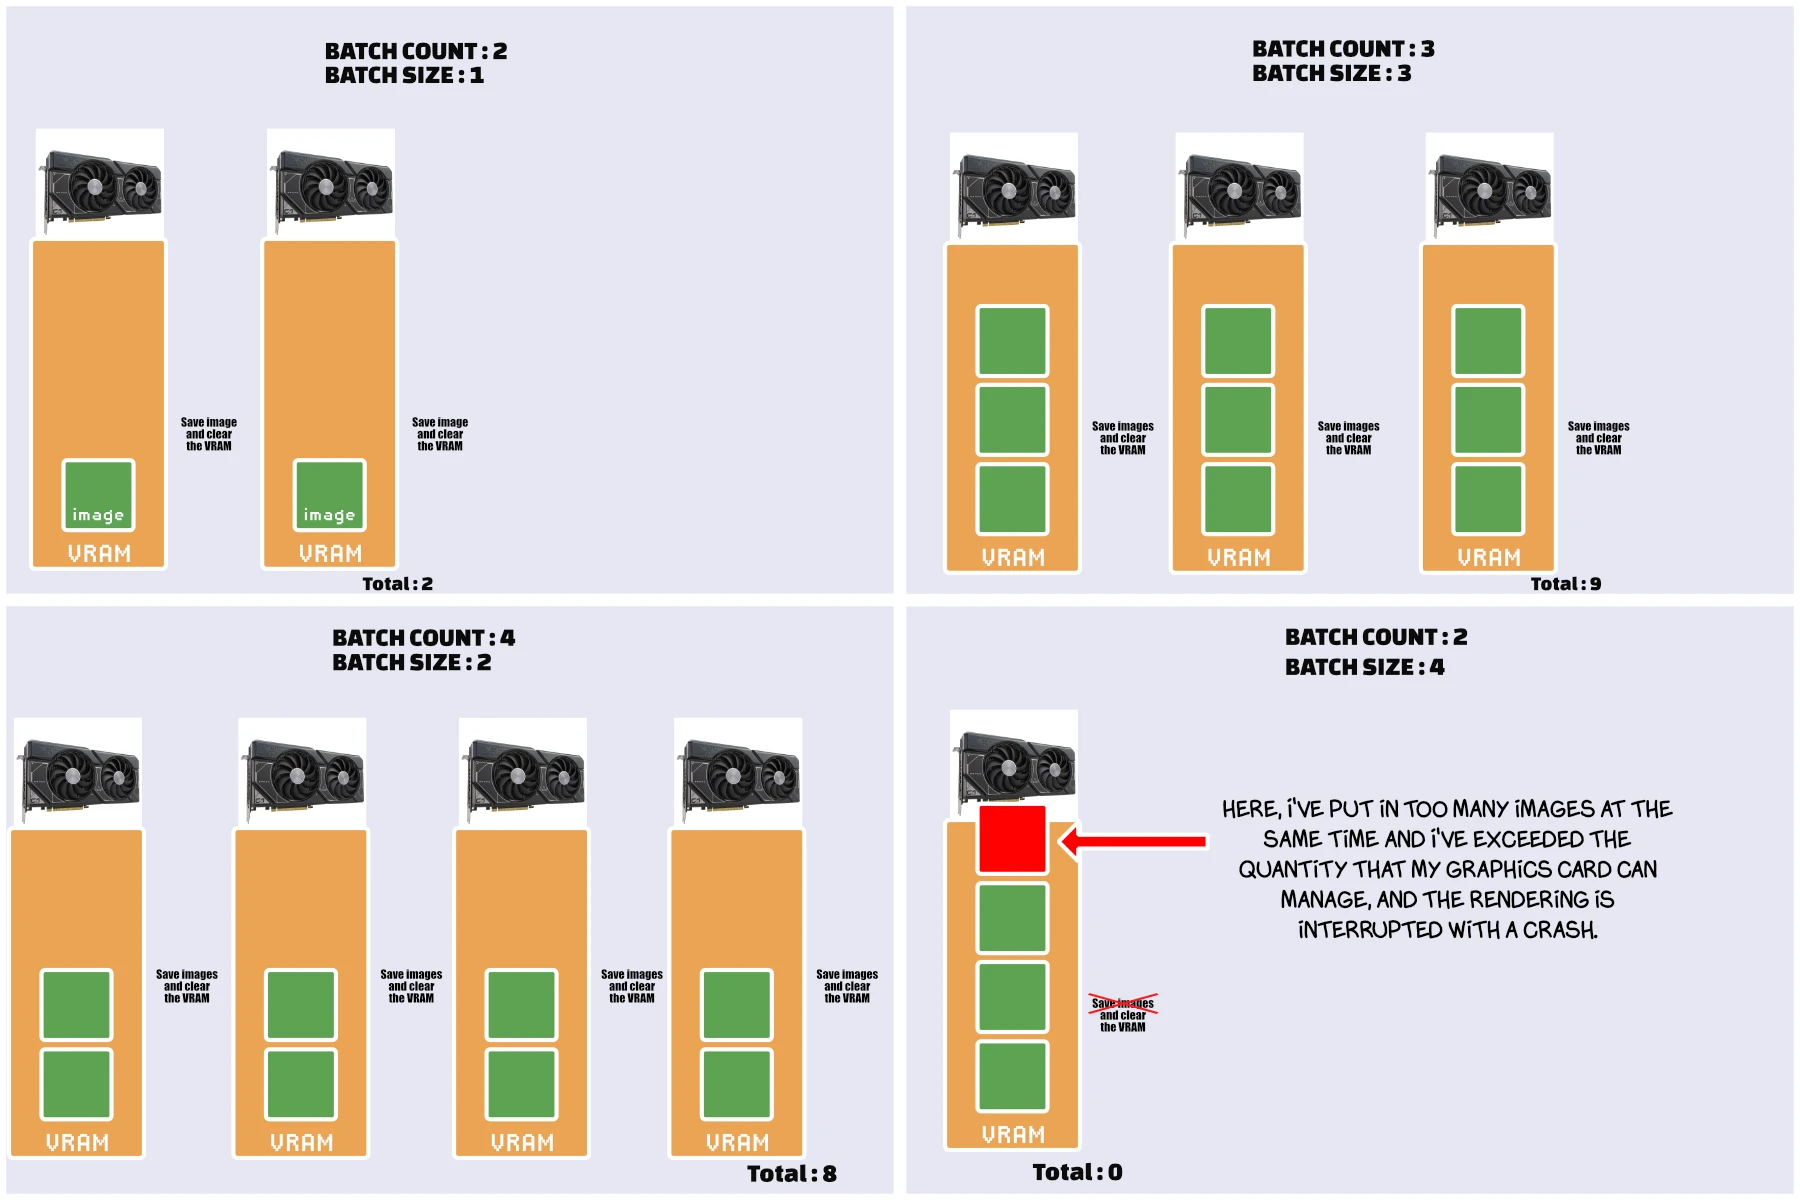
Batch Size Explained
In this example, I'm assuming that the images are all 512x512. For a graphics card with 8GB of VRAM with --medvram enabled. Logically, if you generate larger images, you can use fewer and vice versa.
Which is better?
Personally, I've always tried to optimize batch size. I've always found that generation is faster, especially with --medvram enabled.
In the end, without --medvram and with a size of 1, I don't see much difference. So to avoid unpleasant surprises, I advise you to test without --medvram and with a size of 1, and if your graphics card doesn't flinch, do the same. If not, set --medvram and increase the batch size to compensate a little.
Opinion from a friend
«Regarding generating images in batches. While you're free to use whatever batch counts you want, there is rarely any reason to use batch sizes above 1 unless you're running it in the cloud. Higher batch sizes slow down each step of the generation, and the increase in generation speed is quite small compared to the strain on your computer larger batches causes. In my experience, you might get 10% more speed when doing a batch size of 8 but at the cost of making everything else on your computer run a lot slower.»
Who to Prompt
Positive Prompt (or just "Prompt")
For prompts, there are two schools of thought, which can be mixed: keyword and sentence.
2 girls playing at the river
or
2girls, playing, river
What do you need to use? Simple : look what the creator of your model said is better to use.
It’s totally possible to mix them. For example
(best quality, masterpiece:1.2), (2 girls running outside:1.1), blue sportwear, joyful, happy, open mouth, sweat, (hot:1.1), sun
The order of your keywords is important. The further your keyword is from the beginning, the less powerful it is.
Full typical prompt example
(best quality, masterpiece:1.2), 1girl, standing, solo, pose, big eyes, wide oval eyes, one eye closed, lip liner , (photoshoot studio:1.1), huge breasts,
skinny, skindentation,
one side up, purple eyes, light brown hair, big hair,
thick thighs, (pink luxury fashion:1.1), very dark skin, ebony,
<lora:GoodHands-vanilla:1> nice hands, perfect hands

- Generic keyword quality
- Character infos
- Character Details
- Location keywords
- Quality details
Prompt syntax
«Hey I write long hair in my prompt it’s doing nothing! My waifu have normal hair.»
At some point in your prompt, you'll probably want to modulate a particular word more or less strongly. To do this, the interface allows this syntax:
Use (long hair:1.1) will be more significant. Not go further than 1.3, it's useless, even counterproductive.
«Hey I write long hair in my prompt, but it’s too long ! My waifu as massive long hair wtf ?»
Use (long hair:0.9) will be more significant.
Tips: You can use a negative value. It’s rare, but some overloader support this. Referee to the notes from the creator.
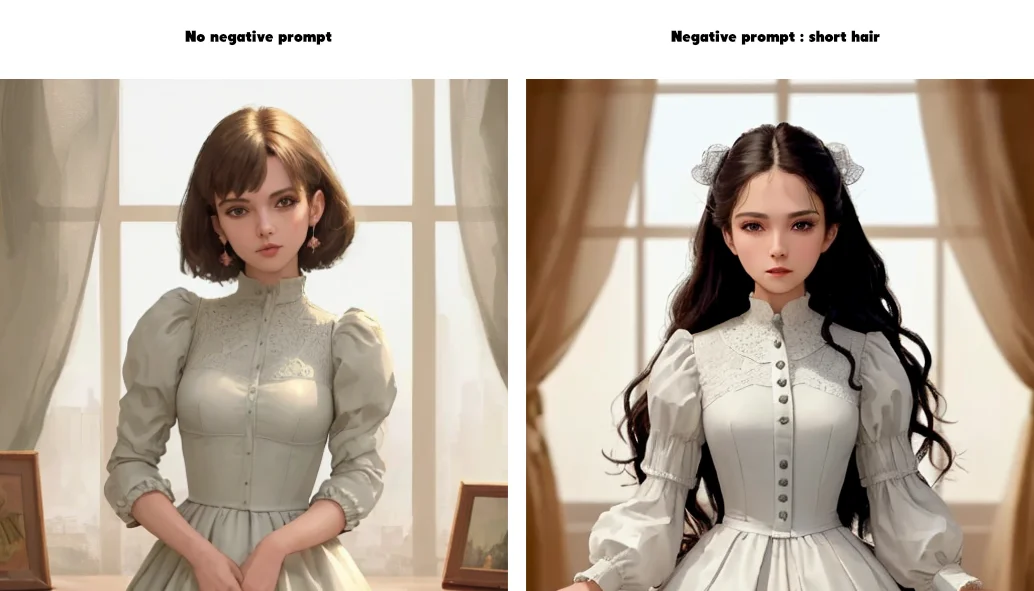
Negative prompt
The prompt lets you say what you want. The negative prompt lets you say what you don't want.
Don't underestimate the power of the negative prompt. It's a powerful tool for improving the rendering and stability of your prompts.
You can also put Lora, Embedding etc… in negative prompt.
Examples
For this positive prompt:(best quality:1.2), (masterpiece:1.2), 1 woman, clothes
Simple negative prompt
More complex negative prompt
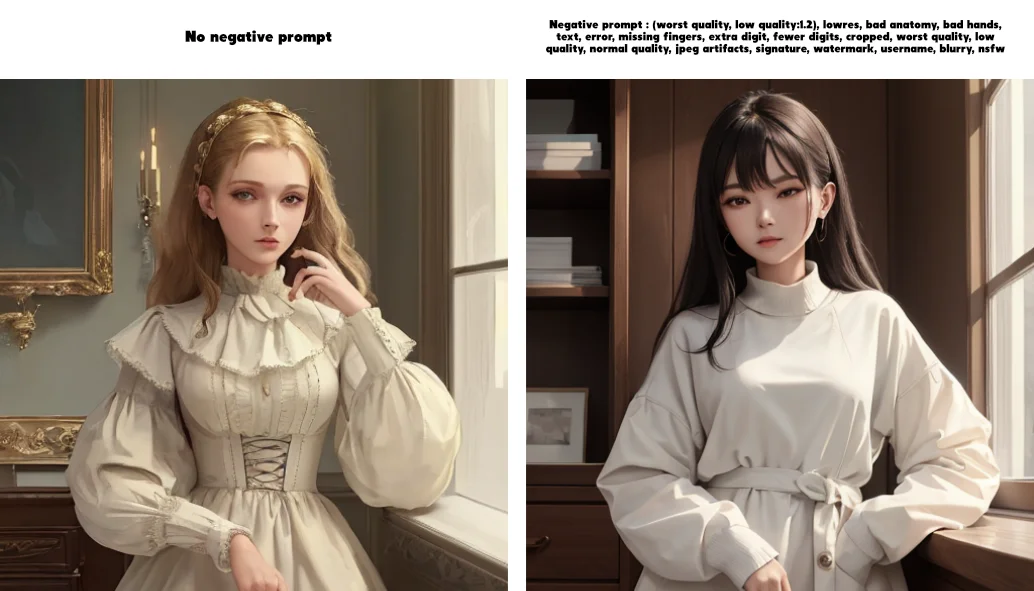 Code:
Code:
(worst quality, low quality:1.2), lowres, bad anatomy, bad hands, text, error, missing fingers, extra digit, fewer digits, cropped, worst quality, low quality, normal quality, jpeg artifacts, signature, watermark, username, blurry
Example with some embedding
The trouble with negative prompts. It's hard to know what to put in them, and they can get very long.
One of the best solutions is to use negative embeddings. Think of them as keywords that embed hundreds of other keywords.
For start, you can using them:
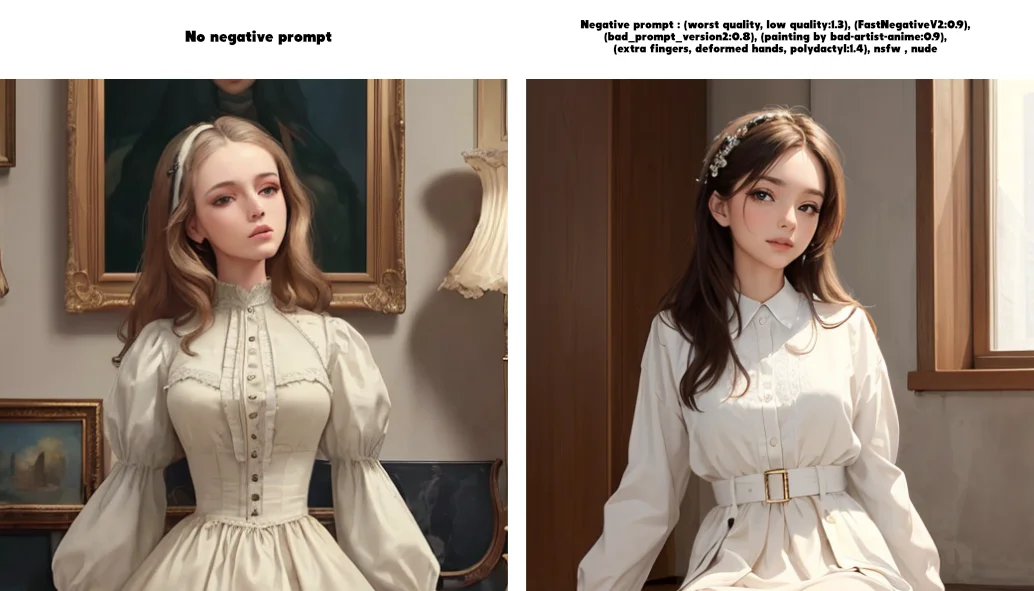
Code:
(worst quality, low quality:1.3), (EasyNegative:0.9), (bad_prompt_version2:0.8), (painting by bad-artist-anime:0.9), (extra fingers, deformed hands, polydactyl:1.4), nude, completely nude
The overloaders
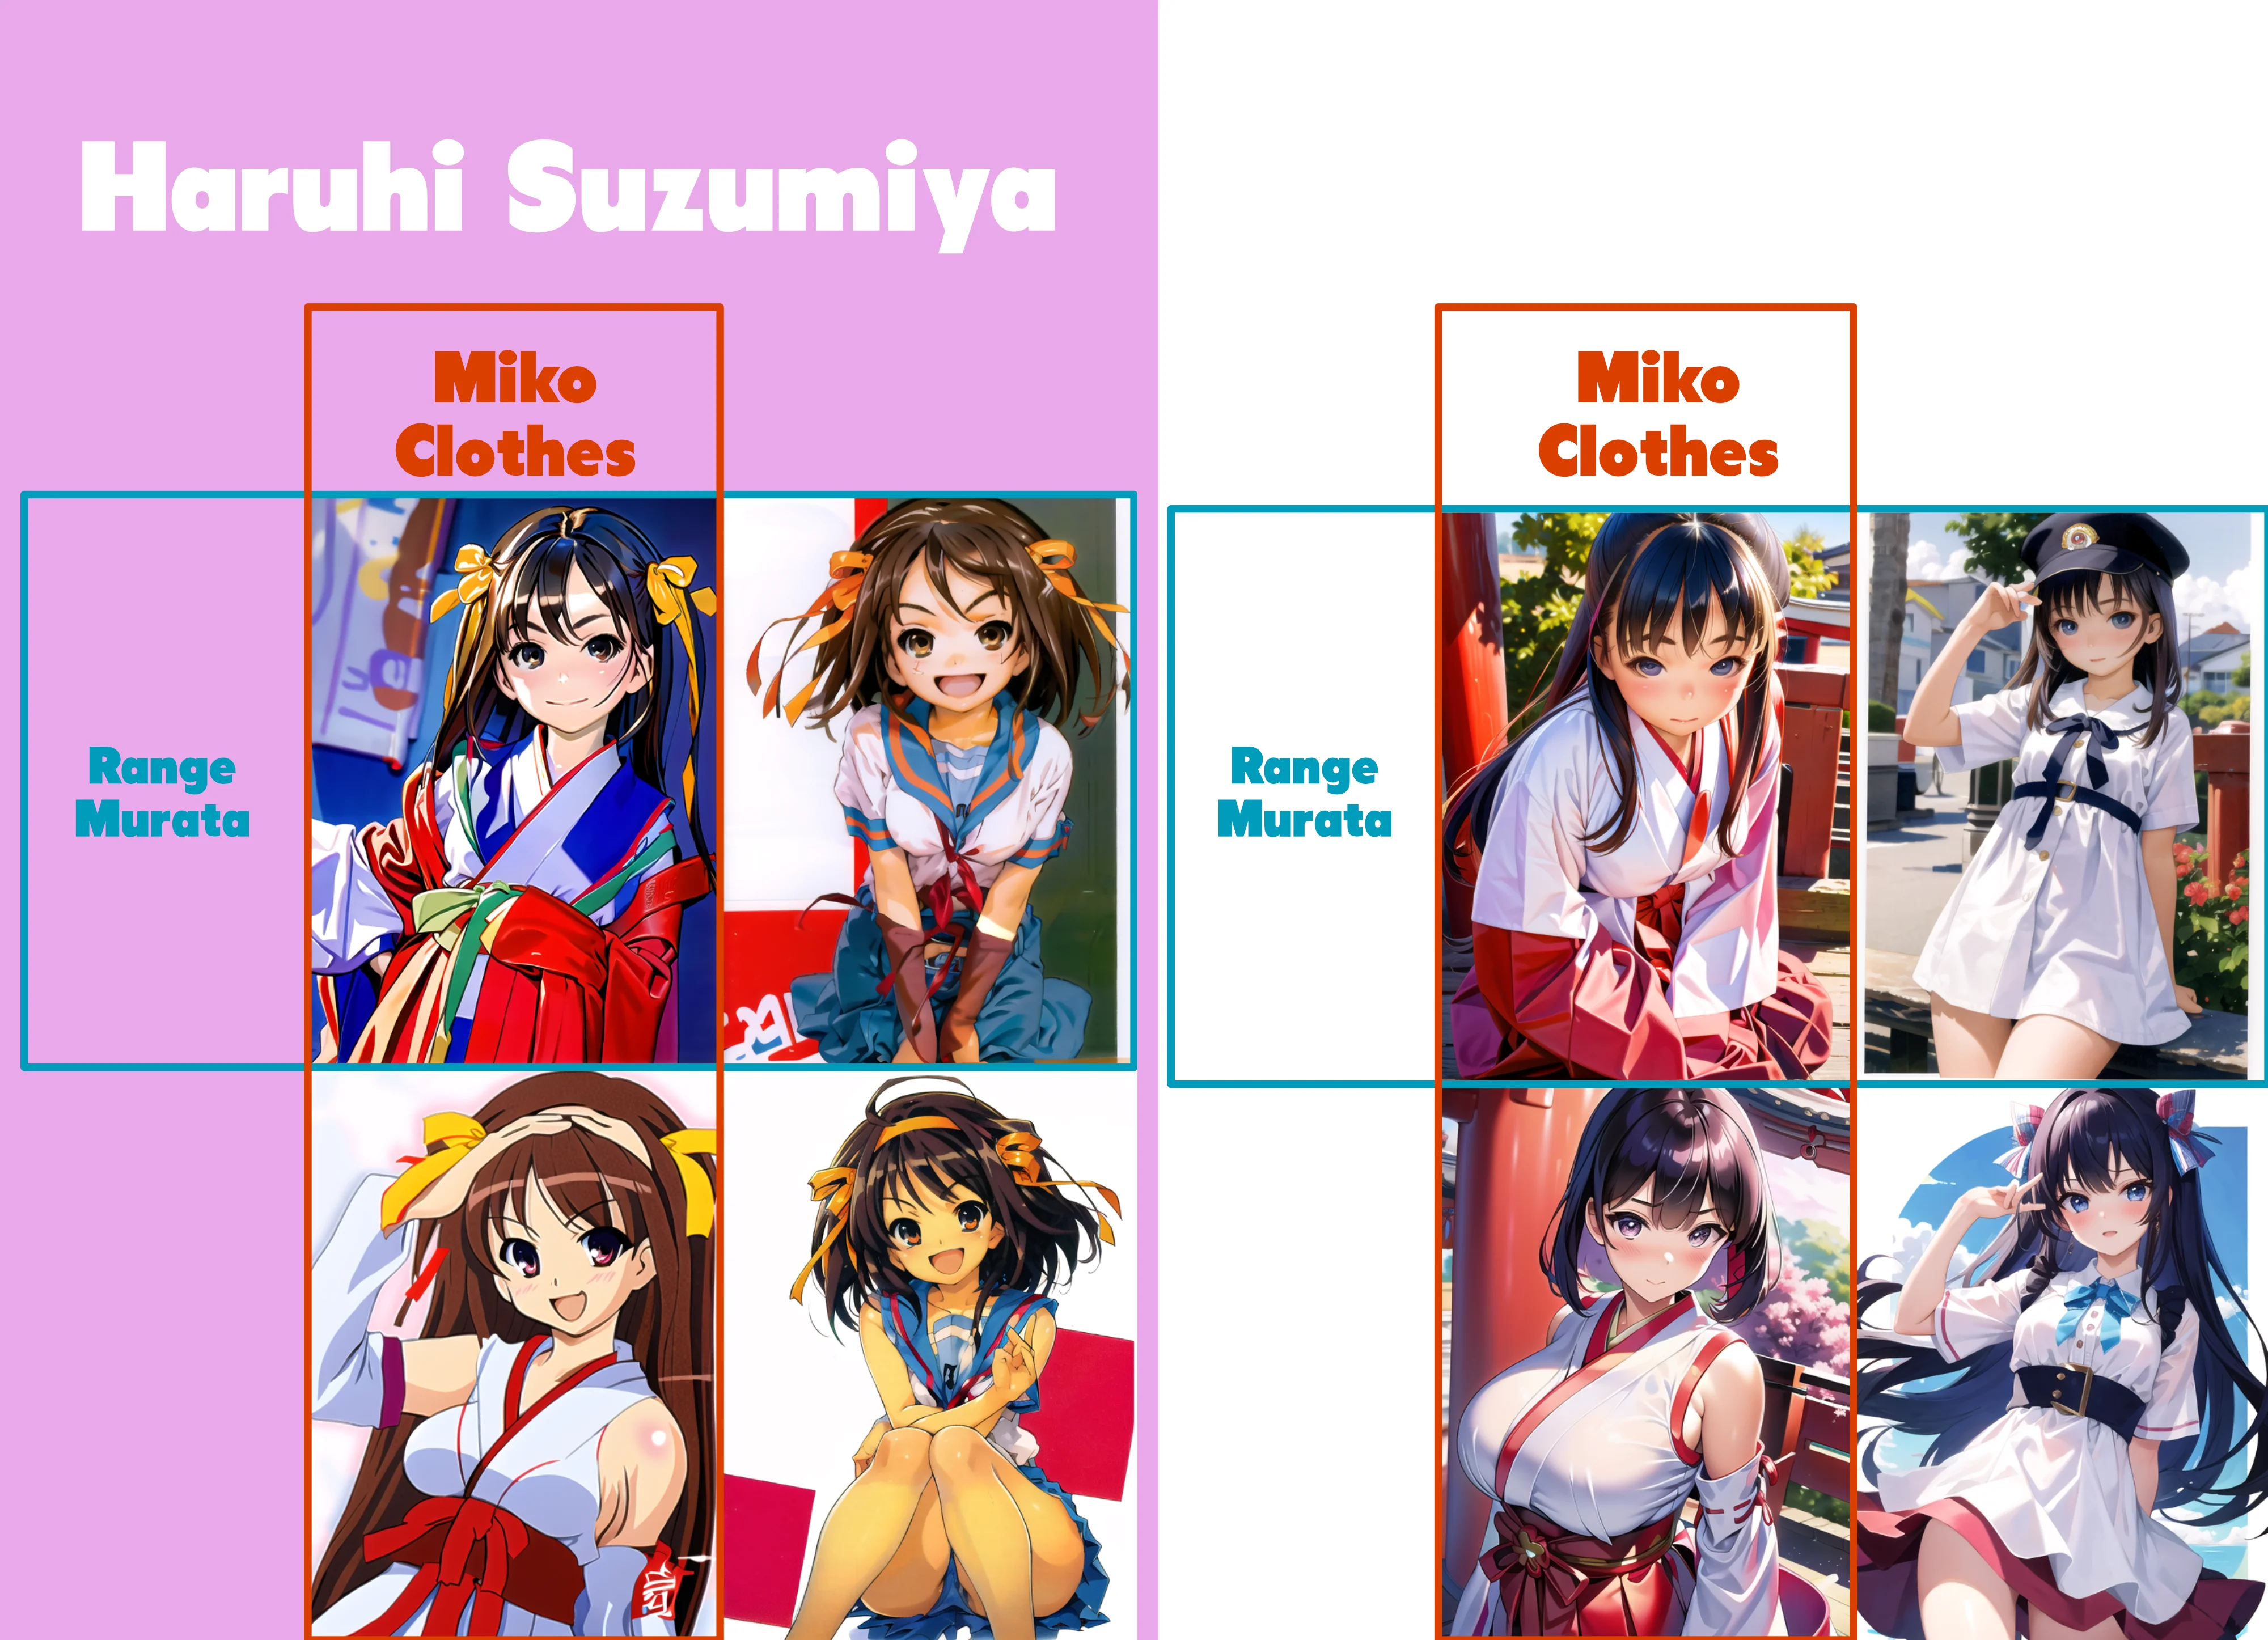
Ok, you have a model who does manga, that's cool. but what if I only want images in the style of one particular mangaka?
Or if I want all my renders to create characters in Japanese school swimsuits? How do I go about it?
You have two options. Pray that your model knows the mangaka, or your swimsuit.
Or use an "overloader" (a term invented by me).
This overloader will bend your model towards what it was created for.
In theory, they're all compatible with all models, but logically an overloader that copies a mangaka will do better on a manga model.
There are several types of overloader "technology" :
Embeddings/Textual Inversion, Hypernetworks, Lora and LyCORIS
You can use multiple overloader in same time and multiple type of overloader.
Overloaders in automatic1111 UI
Embeddings/Textual Inversion
Just write the file name in your prompt :
very_big_pasteque
For load this file: stable-diffusion-webui\embeddings\very_big_pasteque.pt
Hypernetworks, Lora and LyCORIS
You need to write the name and the force like this :<TYPE:THE_COMPLETE_NAME:FORCE>
Ex :
<lora:MikoClothes_v2_1:0.8>
Some time will need some «triggers words» just read what say the creator of the overloader.
For the Lora «MikoClothes_v2_1» you need to add this in your prompt :
<lora:MikoClothes_v2_1:0.8> AND miko clothes.
Of course, you can mix everything together, but be careful: if you overdo it, you'll just break everything.
Category
It’s only a personal categorization, but it’s work well.
- Chara: I want Haruhi Suzumiya.
- Concept: I want a Miko clothes.
- Style: I want here drawing by Range Murata.
Et voilà!
«WTF ? Why so many sampler ? what i can use HEEEELP»
The samplers
ok, we will make it simple :
Start with
UniPC. If the face is ugly, try :
-
DPM++ 2M SDE Karrasif bad result, try next. -
DPM++ 2M Karrasif bad result, try next. -
DPM++ 2M SDEorDPM++ 2Mif the rendering is still bugged, try next. -
Euler a.
«Sampling steps» what is this shit ?»
The more you have steps, the more you pics is qualitative
BUT!Samplers don't all need the same number of steps to deliver the same result, and some samples are faster than others with the same number of steps.
- Prompt test and mass product with DPM++ 2M SDE Karras : 12 steps | Quality render : 20
- Prompt test and mass product with DPM++ 2M Karras : 12 steps | Quality render : 20
- Prompt test and mass product with Euler a : 16 steps | Quality render : 25
- Prompt test and mass product with UniPC : 12 steps | Quality render : 16
TxtToImg
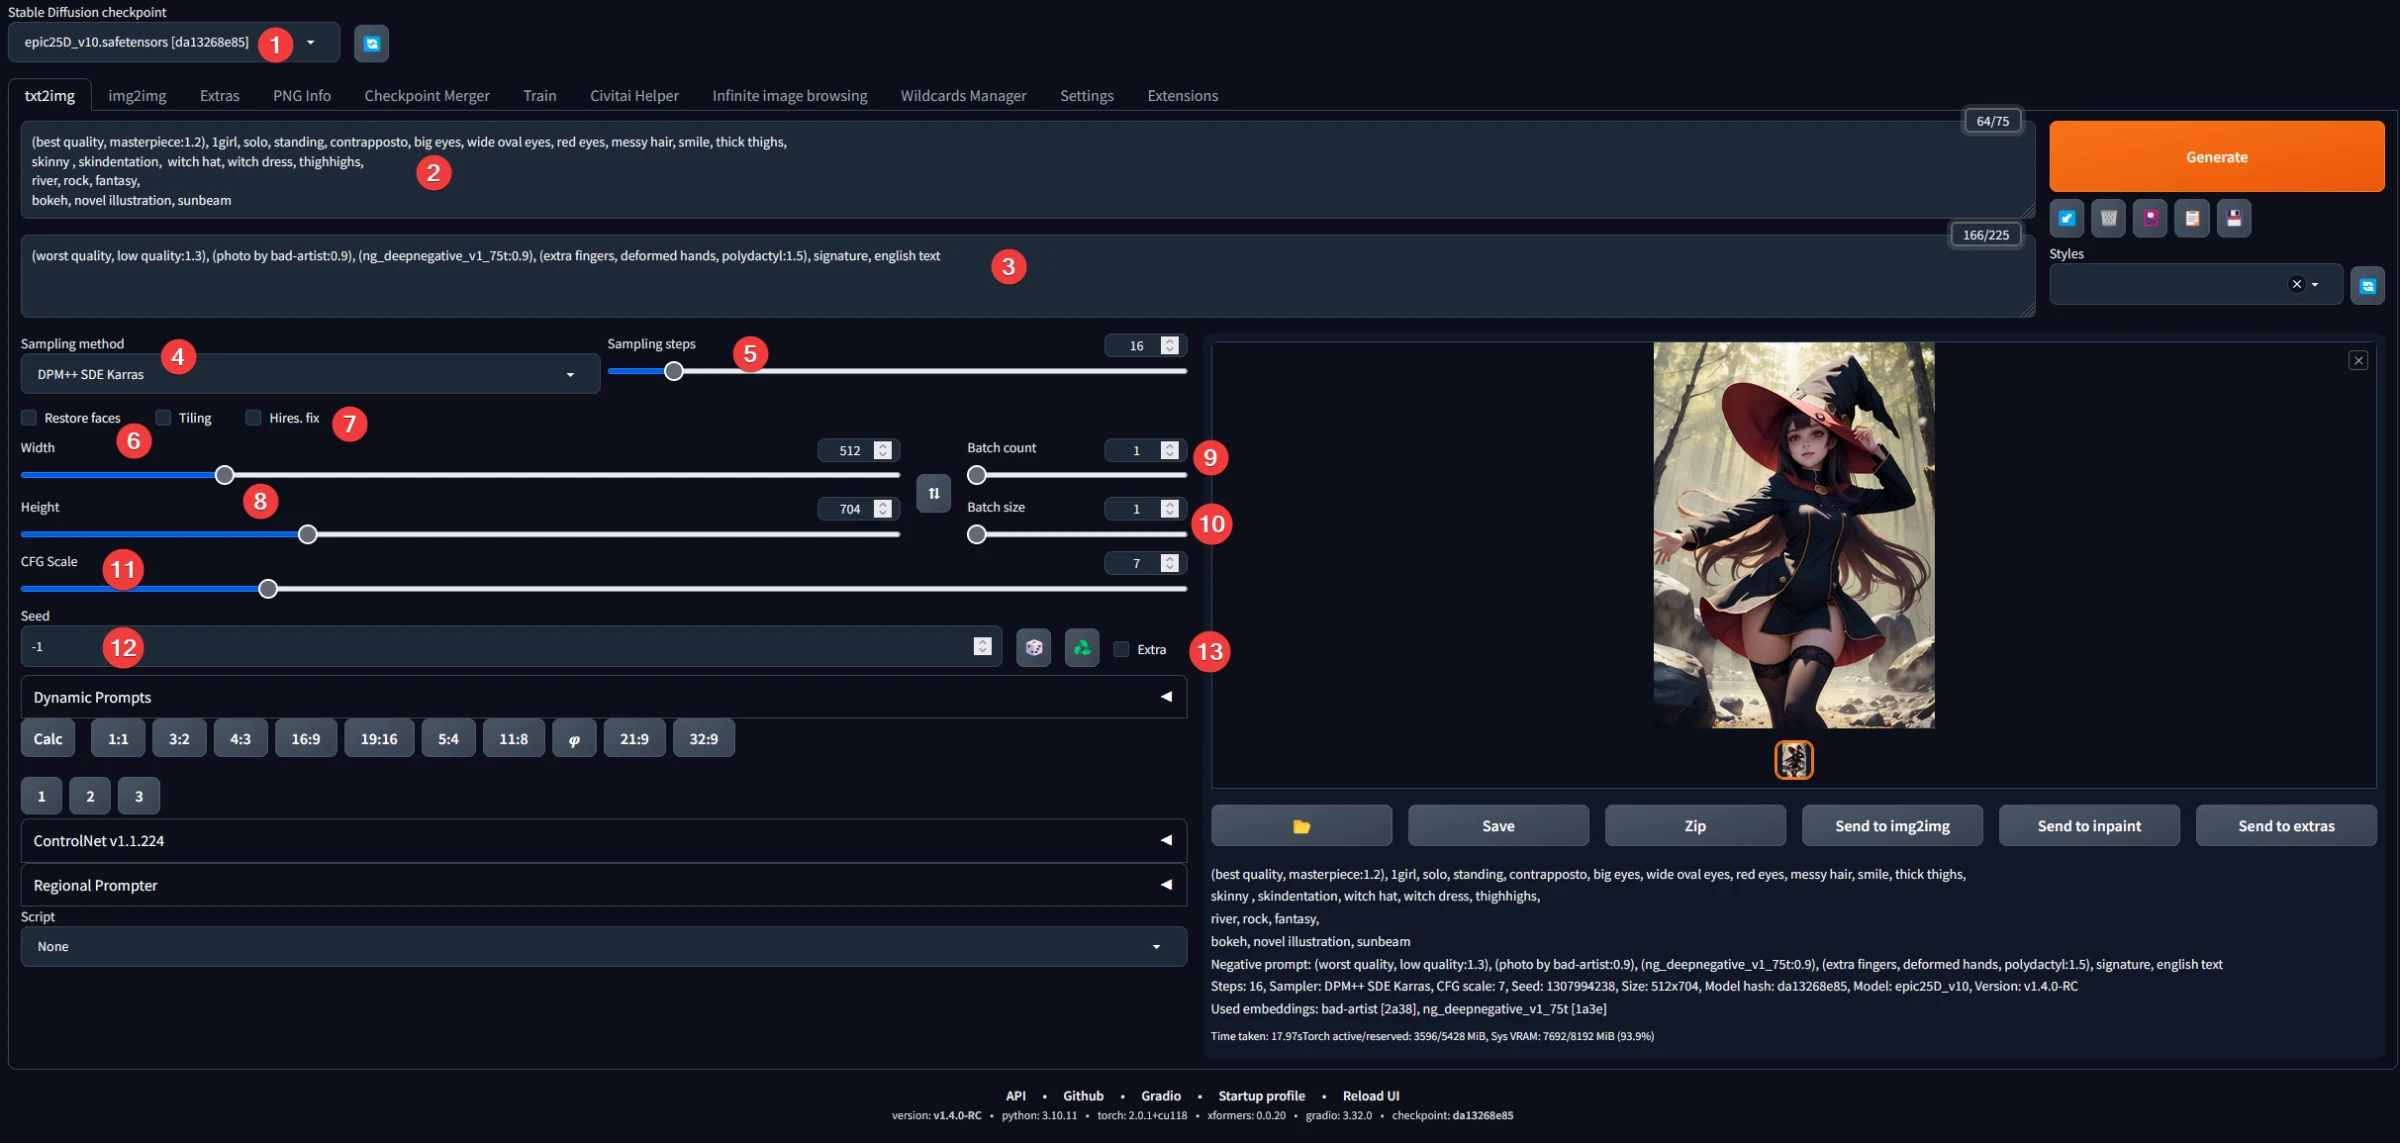
- Choose your model.
- Make your prompt.
- Don't forget your negative prompt.
- Select a good sampler.
- And an accurate number of step.
- Never enable this if you use an anime or comic model (read the note below).
- Don’t use this, we will upscale later, if you enable the Hires Fix all your image will be upscale.
- Choose your dimension. Take care, big image will blow up your VRAM. Prefer to create smaller image, we will upscale them later. Absolute limit max : 900px
- go there
- go there
- More you up him more your model will follow your prompt, if you lowered him, your model will be more creative. Move between 6 and 12.
- The seed. If you set a fix number, and use EXACTLY, the same prompt, neg prompt, sampler etc… you will have the exactly same image.
- (TODO)
Procedure
Start by making your prompt and taking a generic negative prompt. Lower the number of steps to 10-12 and generate a group of small images of around 512px. (you can increase the bach size if you want)
Once you've got something more or less to your liking, increase the number of steps, let's say…20 and increase the size a little, why not 648px. Personalize your prompt and negative prompt a little more. Reduce your batch count to 2 and size to 3.
Keep improving your prompt until a batch of images catches your eye. Save the ones you like and then send them to ImgToImg or upscaling.
Tips: You can change the values of batch count and size following your VRAM capacity. Each Lora, LyCORIS, Hypernetwork, or Embedding you use this will increase the rendering time.
Notes
The Restore Face option
Be careful with this parameter, it may seem practical at first glance, but in reality it can make a mess of things. It will slow down each of your generations.
But moreover, it's going to make your faces look ultra-realistic, which can make the whole thing unsightly. What's more, it's easy enough to correct a face with a better prompt or with inPainting (TODO).
Hires Fix
I'm not a big fan of this parameter. The reason is that you lack control and can't customize the rendering. Plus you skip the img2img step. What's more, if, like me, you have a graphics card with only 8g of ram, you can very easily exceed the limit and lose the rendering.
However, a friend pointed out to me, it can be very practical to send a large number of images to the next generation and come back with images that have already been upscaled to good quality, thus avoiding some of the work.
Img2img
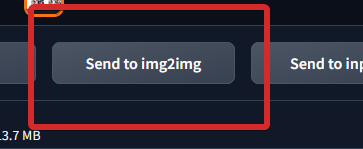
ok, now you've done lots of txt2img and you've got an image you like, but... you'd like to do some variations, to see if you can do better.
To do this, you send your image to img2img and you have a button under the image you like that lets you copy the image into img2img along with its information and prompt.
Once you're in img2img, you're faced with numerous obscure parameters. Here's what I recommend getting started.
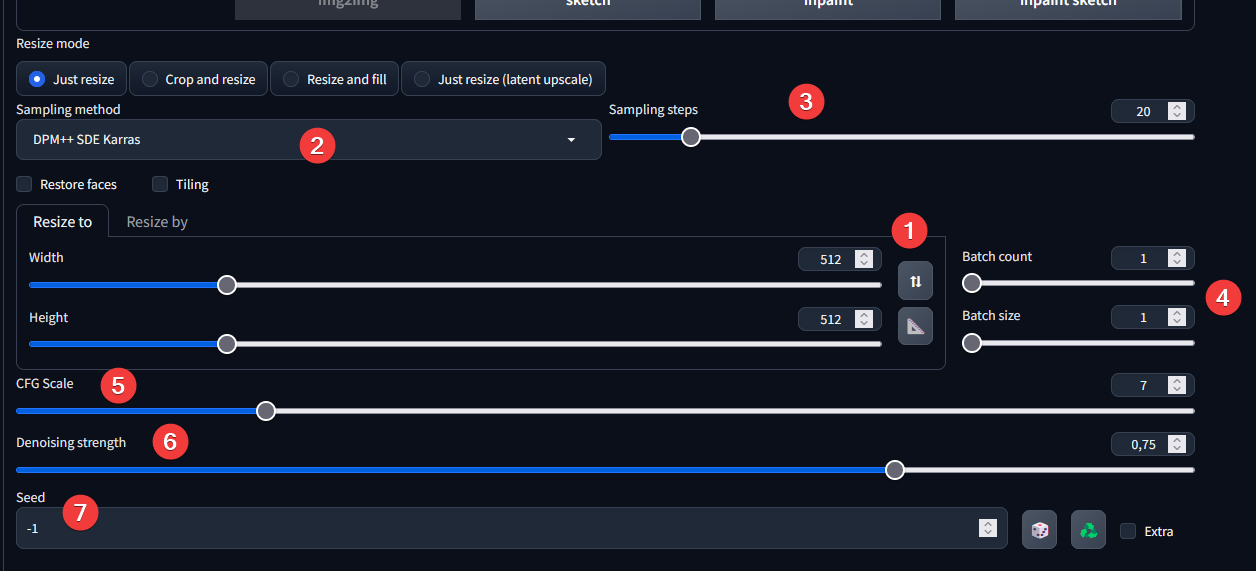
- let the same width and height
- same sampler
- same sampler step
- for the batch. you know the deal
- same than txt2img
- It's with this parameter that you'll be able to define whether you want variations that are very similar to or very different from your original image. at 0.2 or less you'll have minor variations, at more than 0.7 images that may have nothing to do with the original image. in general, 0.5 is a good start. note that all models have different sensitivities, so it's up to you to test.
And click to generate. Wait a moment and say hello to your variations :
Example
Original image

Variations
Of course, there's nothing to stop you from taking one of these variations, sending it to img2img with the same button just above it, and making new variations on it!
Important
In img2img your also prompt WORK!
If you modify your prompt to change hair color or location, for example. He'll take it into account in his variations. But be careful, if you want to make a real difference, you have to think about raising the denoise enough.
You can also change the model!
And after?
You can go to upscaling Or go to inpainting(TODO)
Upscaling
«Why use an upscale in img2img rather than the upscale available in extra tab?»
The tools available in extra are great, especially for quickly upscaling images that have not been generated by AI, or for making a final upscale.
But it has one big flaw: it doesn't correct errors, and doesn't allow you to use a prompt to modify the image. On the contrary, if you look at the full example below, you'll see that upscaling via img2img has, for example, corrected the face. And a little of the hand etc…
It's really much more powerful and allows you to create high-quality images.
Okay, let's get started.
First you will need an upscaler (pth file) you can use the own already present, but personally, I prefer to use alternatives.
More upscaler there : Upscale Wiki
You need to put your upscaler in this folder: stable-diffusion-webui\models\ESRGAN
I prefer to use the extension script, rather than the official script : Coyote-A/Ultimate Upscale
Also important, always set the resize mode to :

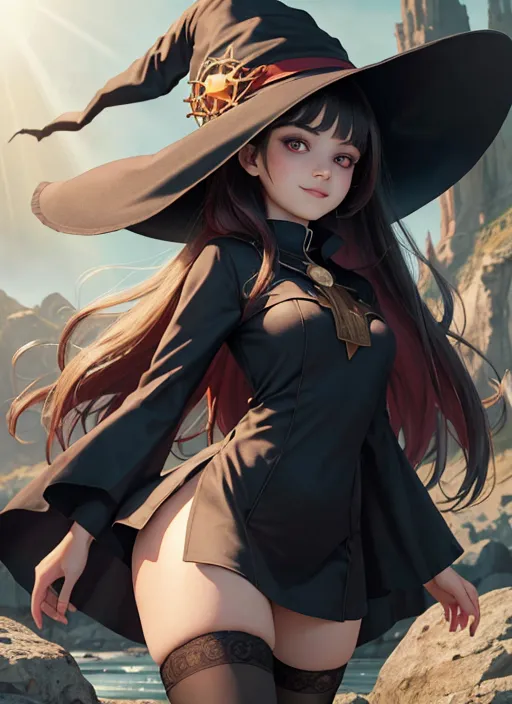
Full example
Starting image
chosen from txt2img
First upscale
Denoising strength : 0.35
Second upscale
Denoising strength : 0.35
«Painting? but why do you want me to paint, if I use an AI it's because I don't know! »
Inpainting
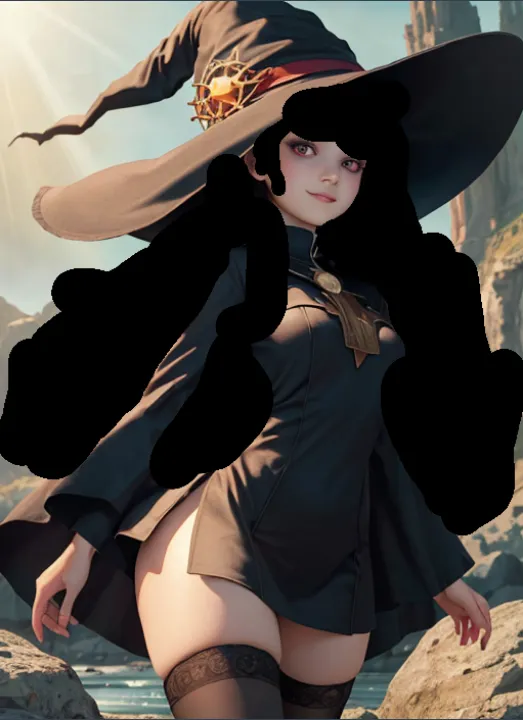
Inpainting the whole picture
Once you've got an image you like, which you've passed through txt2img, img2img, you may find that certain elements still don't fit, such a hand, or the background of the image. To correct these elements, you can define a particular area by "painting" it and generate images in which only that part will be modified.
In general, I recommend correcting large details before doing any upscaling, once you have an image that suits you in low resolution, upscale it a 1st time, take that image, correct it, and then upscale it one last time.
To direct the AI, I only modify the part of the prompt that interests me according to what I want to have. For the moment, it's better to leave the whole prompt.

white hair
pink hair
white hair, bob cut
pink hair, multiple braid
For after, we'll say that the image with the white and short hair suits me. So I upscale with this one with «Send to Img2img»
Once you've upscaled the image - and I'd advise you to use the "ultimate SD upscale" extension - you can once again correct details in this image by sending it to "InPainting". But you'll run into a problem.
I remind you that going beyond 700px images is starting to cause problems, and you could exceed the VRAM limit of your graphics card.
And now you have an image that exceeds 1000px in height. To get around this problem effectively, you'll have to play around with some parameters :
Painting only the masked
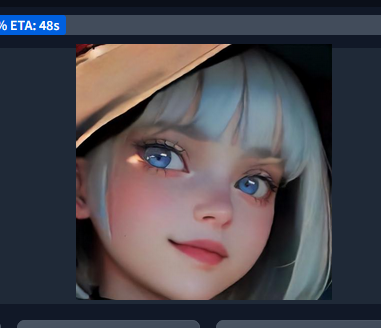
In this example, I'm going to assume that I'm not satisfied with the eyes. So, as before, I'm going to cover the area in question
blue eyes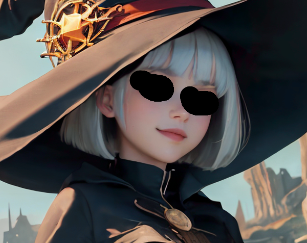
And for the parameters :
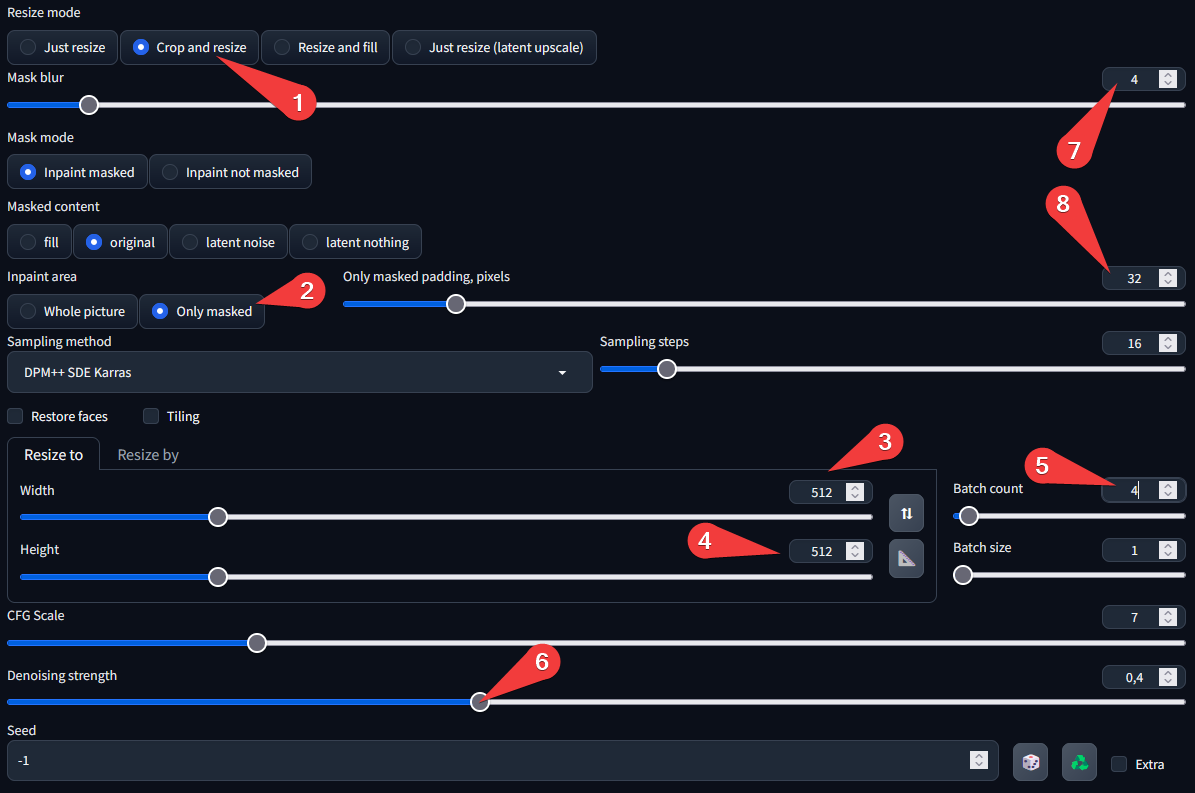
- just for be sure
- THE MOST IMPORTANT HERE, when you choose this option, you tell the software to redo only the masked part; it will cut out a rectangle and work only on it, ignoring the rest of the image to avoid filling the ram unnecessarily. The software simply glues the new section onto the old image at the end, merging them together.
- Because we have check "only masked" this parameter will not generate the full image in 512px–
- – But only the part i have only the area I've covered. in this exemple, the eyes.
- As we generate lots of small images, feel free to increase these two values and send lots in a row.
- This one, just like img2img, so feel free to play around with it. Each change will require a different value.
- Sometimes, you'll want the inpainting to overflow a little and be more progressive (or less). This is the value you need to change.
- Adding more padding, around your painted area, certainly increases the size of your image to be generated. But the AI needs the nier pixels to know in which direction to go. Increasing the value can sometimes help to control it better.
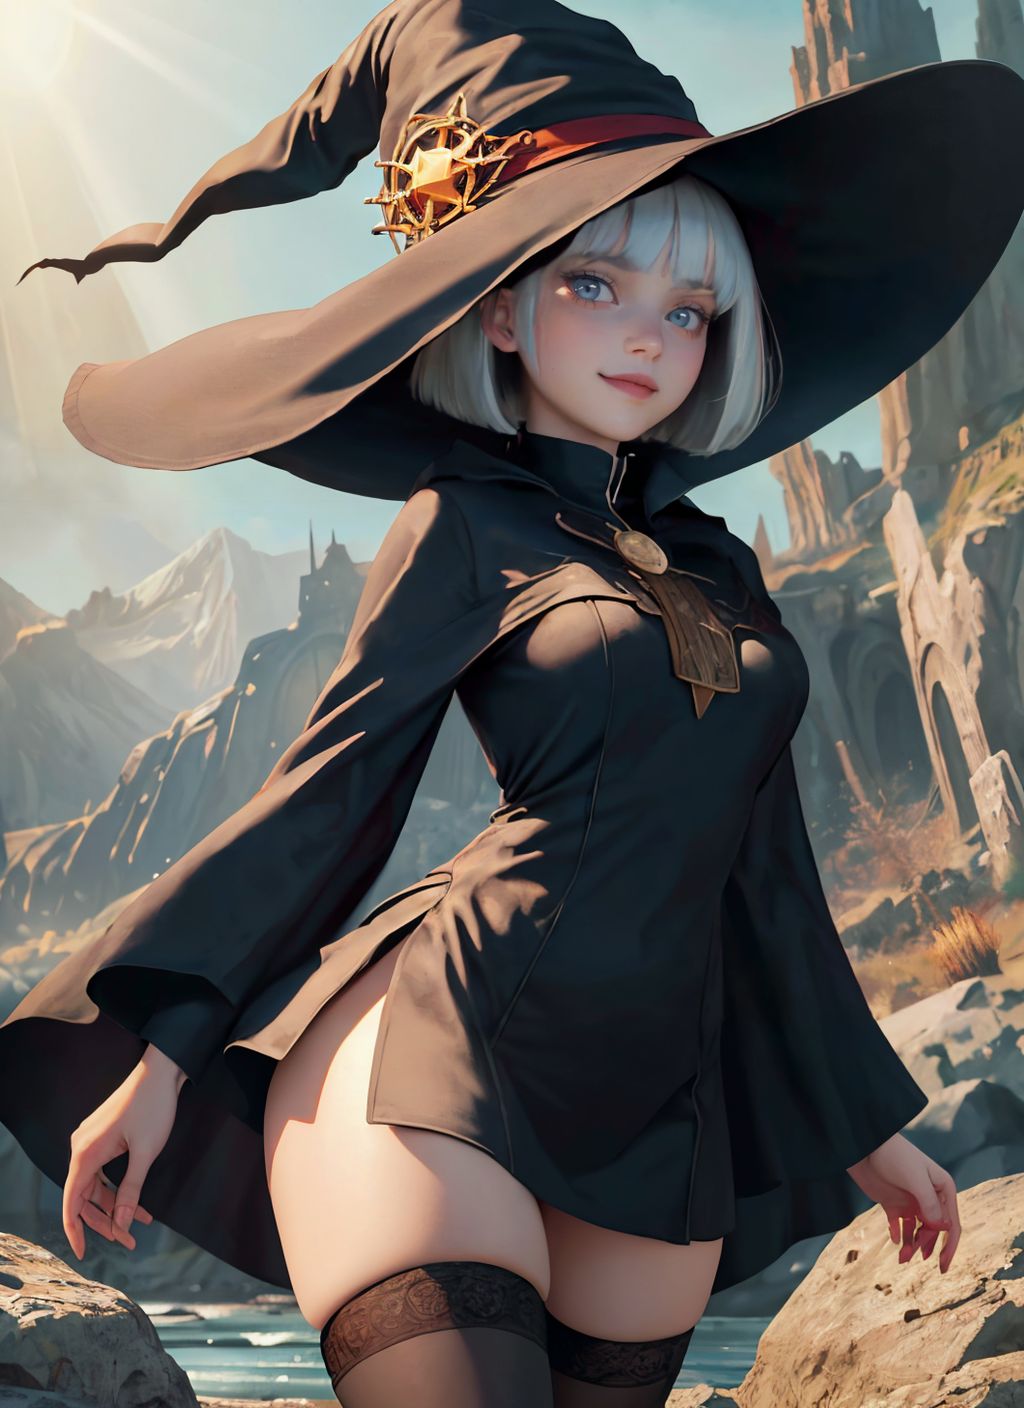
The result :
Finish
Congratulations! You've finished the main part of this tutorial. Now you have all the basics for prompting as if your life depended on it.
For the future, I intend to add a section on controlNet and a few other modules. I'm not ruling anything out.
Tips
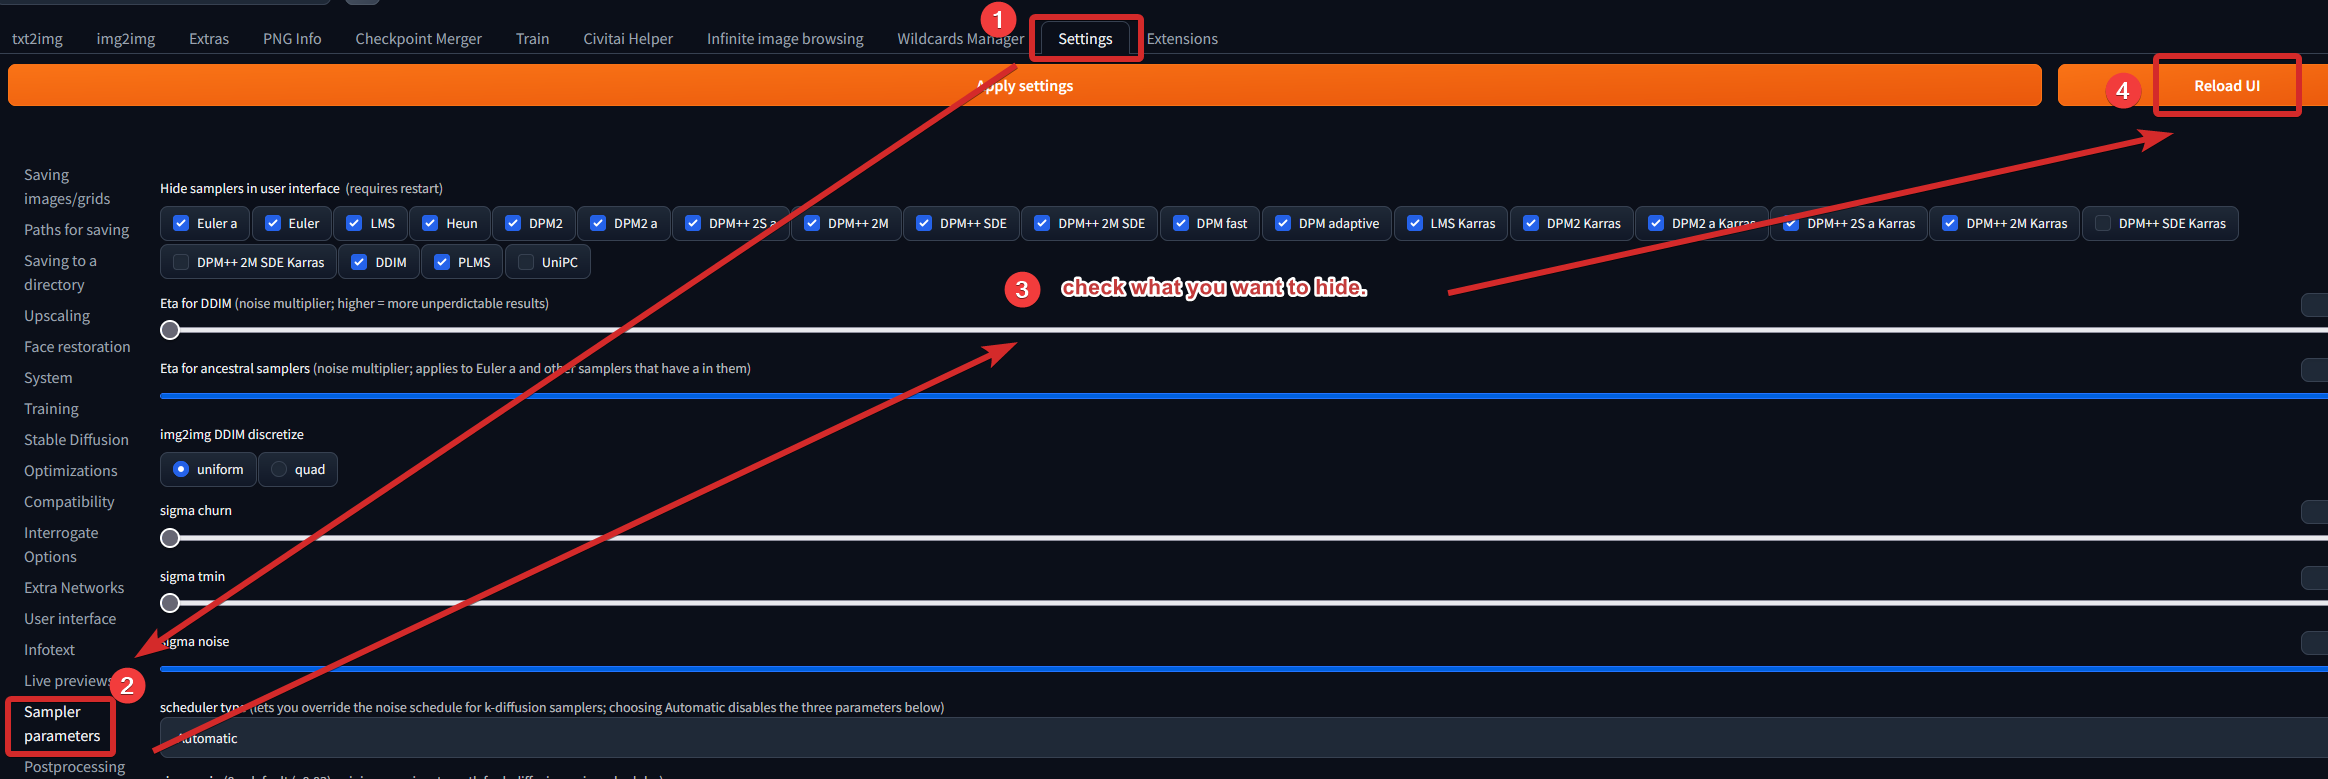
Hide useless samplers
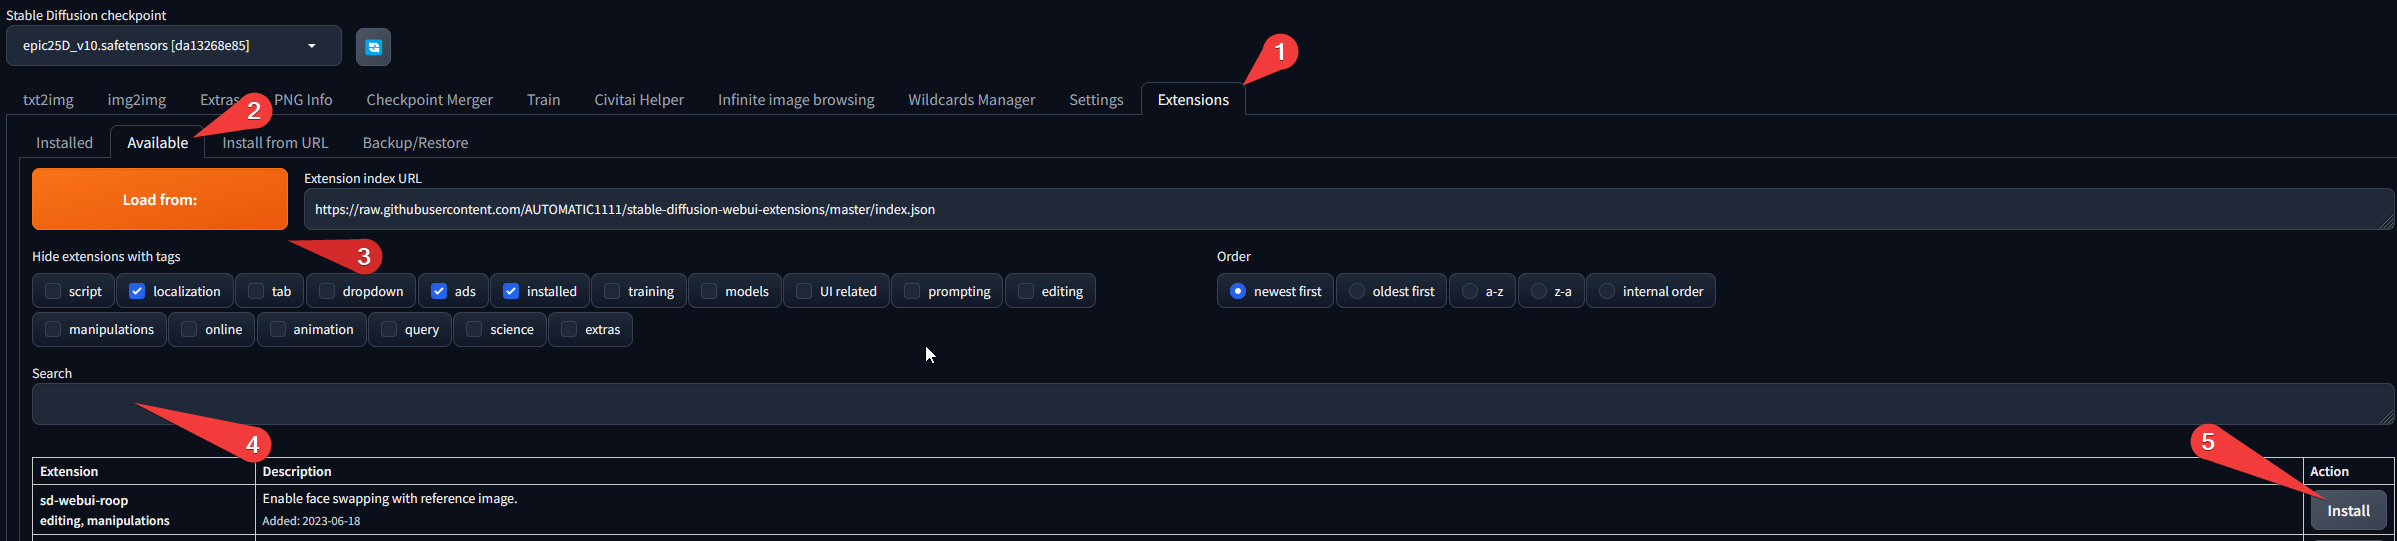
Extensions
They are to use with AUTOMATIC1111 UI.
Most of them can be easly installer from the tab extention.
Lycoris
This extension is no longer needed since version 1.5.0 of Stable Diffusion. I'm leaving it here for information purposes, but you should no longer need it.
Add compatibility to lycoris overloaders, no parameters to change.
Complete documentaion, syntax and changelog on the GitHub.
Tag Complete
Add autocompletion in your prompt based on the tag you can find on Danbooru
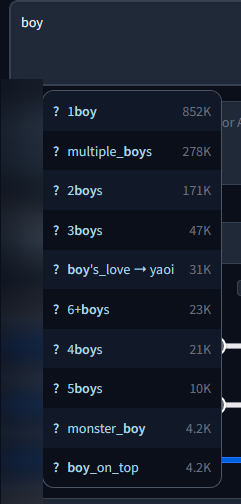
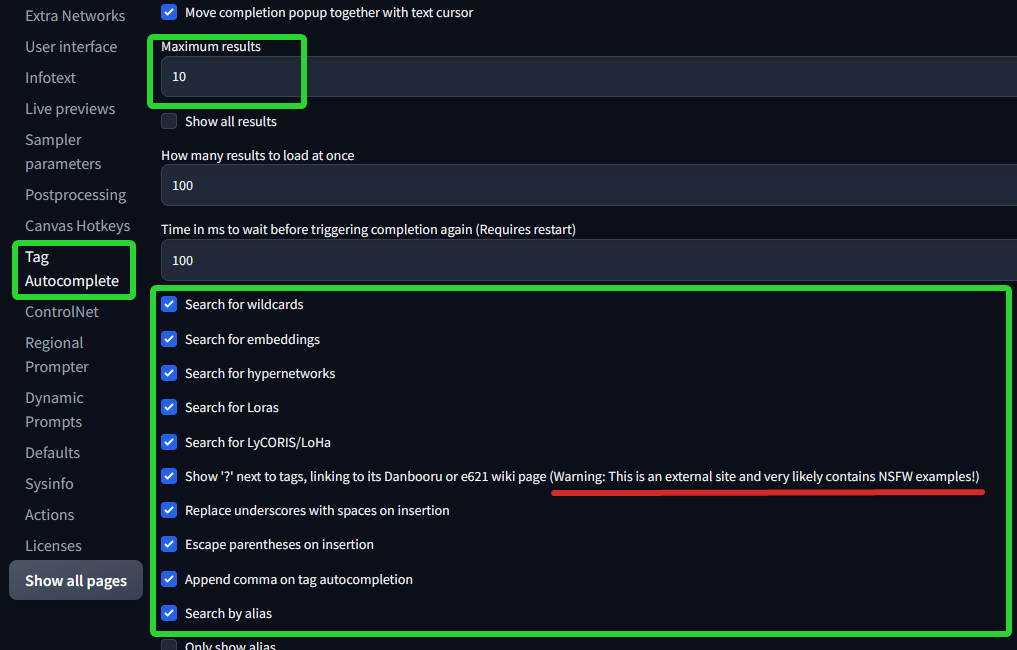
In settings, enable this options if is not already
Complete documentaion, syntax and changelog on the GitHub.
Dynamic Prompts
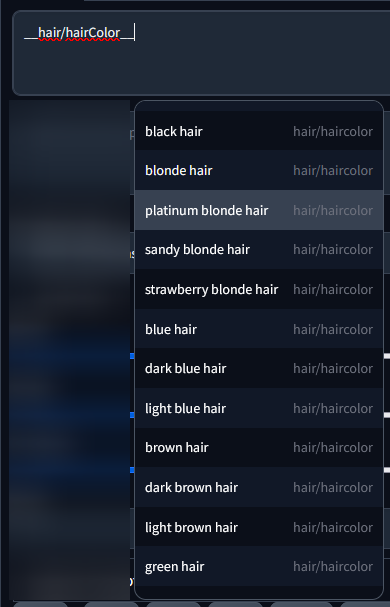
wildcards
Enable the wildcards and dynamic syntax, some powerful tools in your prompt.
hair, (best quality, masterpiece:1.2), __hair-color__ hair , __eyecolor__ eyes, beach
The prompt will take a random value from the file with the same name you need to put the files there :
stable-diffusion-webui\extensions\sd-dynamic-prompts\hair-color.txtstable-diffusion-webui\extensions\sd-dynamic-prompts\eyecolor.txt
You can create your own files or you can also found better and complete wildcard on Civitai.
{ KEYWORKS | KEYWORKS | KEYWORKS }
Randomly choice between the three keyword.
{2:: freckles | body freckles }
Randomly choice between the 2 keyword. But freckles have 2x more change to be choose
red {__clothes/clothing-female__|__clothes/clothing-male__|__clothes/clothing__}
Randomly choice between the three wildcard files.
If you have a1111-sd-webui-tagcomplete insalled, he can detect your wildcard and you also can choose a keyword directly from the autocompletion. It’s not anymore random, but it’s useful if you need an idea.
Complete documentaion, syntax and changelog on the GitHub.
Infinite Image Browsing
Just a simple browser image directly on your interface. Better than the official extension.
Complete documentaion, syntax and changelog on the GitHub.
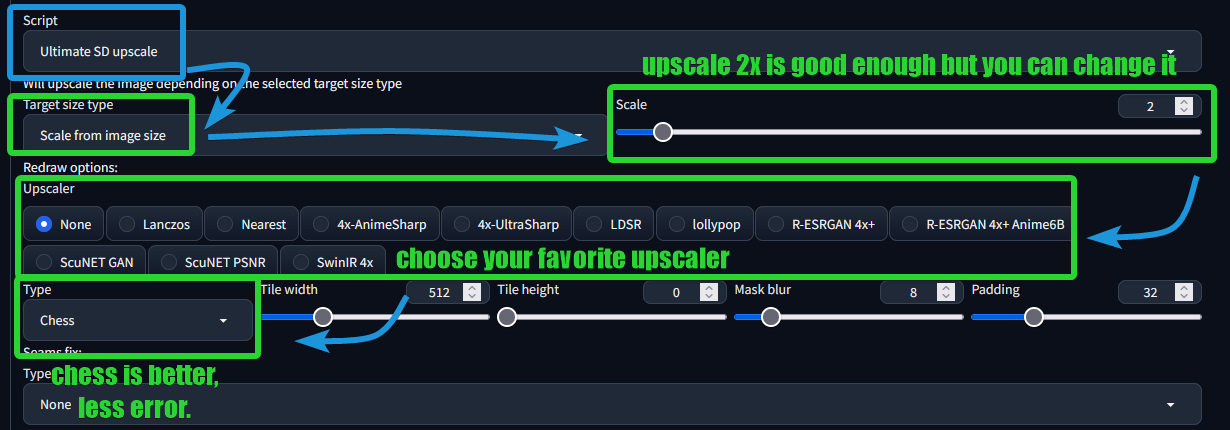
Ultimate Upscale
It’s a farest better upscaler than the default, and it’s compatible with controlNet.
Basic parameters (in img2img at the bottom and in script)
Complete documentaion, syntax and changelog on the GitHub.
Civitai Helper
This extension will make your life easier with the civitai site.
Once installed you can scan all your models, lora, etc... And it will automatically download the preview.
It can also fetch new versions for you and install them. Perfect for saving time and not getting lost in folders.
Complete documentaion, syntax and changelog on the GitHub.
(thanks to a friend for telling me about this extension)
Aspect Ratio Selector
Add some button in text2img and img2img for choose preselect ratio image.

You can add more ratio in :
stable-diffusion-webui\extensions\sd-webui-ar\aspect_ratios.txt
Complete documentaion, syntax and changelog on the GitHub.